QuickBooks Amazon Integration: Step-by-Step Guide
Amazon bookkeeping can get messy fast when sales, fees, taxes, refunds, and payouts are handled separately. The amount Amazon deposits into your bank is usually not the same as your total sales. It is the final settlement after Amazon deducts fees, adjusts refunds, handles tax amounts, and moves the payout to your bank.
That is why connecting Amazon with QuickBooks Online properly matters.
With PayTraQer, you can bring your Amazon settlements, sales, fees, tax entries, refunds, and payouts into QuickBooks Online in a more organized way. Instead of manually entering Amazon transactions or trying to match payout deposits one by one, PayTraQer helps you automate the sync and keep your books easier to review.
Video Tutorial for How to Sync Amazon to QuickBooks Online using PayTraQer:
In this guide, you will learn how to connect Amazon with QuickBooks Online using PayTraQer, configure the basic settings, adjust detailed mappings, download Amazon transactions, review records, sync them into QuickBooks, and track the sync history.
Why Connect Amazon with QuickBooks Online?
Amazon sellers do not receive a simple one-to-one sales deposit.
A single Amazon settlement can include multiple transaction types, such as:
Sales
Amazon fees
Referral fees
Commission fees
Shipping tax
Gift wrapping tax
Withheld tax
Refunds
Customer payments
Reserve balances
Payout transfers
If these are entered manually, it can take a lot of time and still lead to mistakes. You may record the payout as income, miss Amazon fees, duplicate bank entries, or fail to match settlements correctly.
A QuickBooks Amazon integration helps you move Amazon data into QuickBooks Online with the right structure. PayTraQer makes this process easier by allowing you to connect Amazon, choose how the transactions should be synced, map accounts, and review records before sending them to QuickBooks.
What You Need Before Connecting Amazon to QuickBooks
Before you start the setup, make sure you have the following:
A QuickBooks Online company connected to PayTraQer
Access to your Amazon account used for payouts
Admin rights in QuickBooks Online to create accounts, items, classes, or locations if needed
These permissions are important because PayTraQer may need to create or map accounts, products, services, customers, fees, and tax-related entries based on your settings.
Step 1: Connect QuickBooks Online to PayTraQer
If your QuickBooks company is not already connected to PayTraQer, start by connecting it first.
Sign in to PayTraQer.
Choose Connect to QuickBooks.
Follow the authorization prompts.
Allow PayTraQer to access your QuickBooks Online company.
Once the connection is successful, your QuickBooks company name will appear at the top of your PayTraQer account. This confirms that PayTraQer is connected to the correct QuickBooks company and is ready for the Amazon setup.
Step 2: Choose How Amazon Data Should Sync
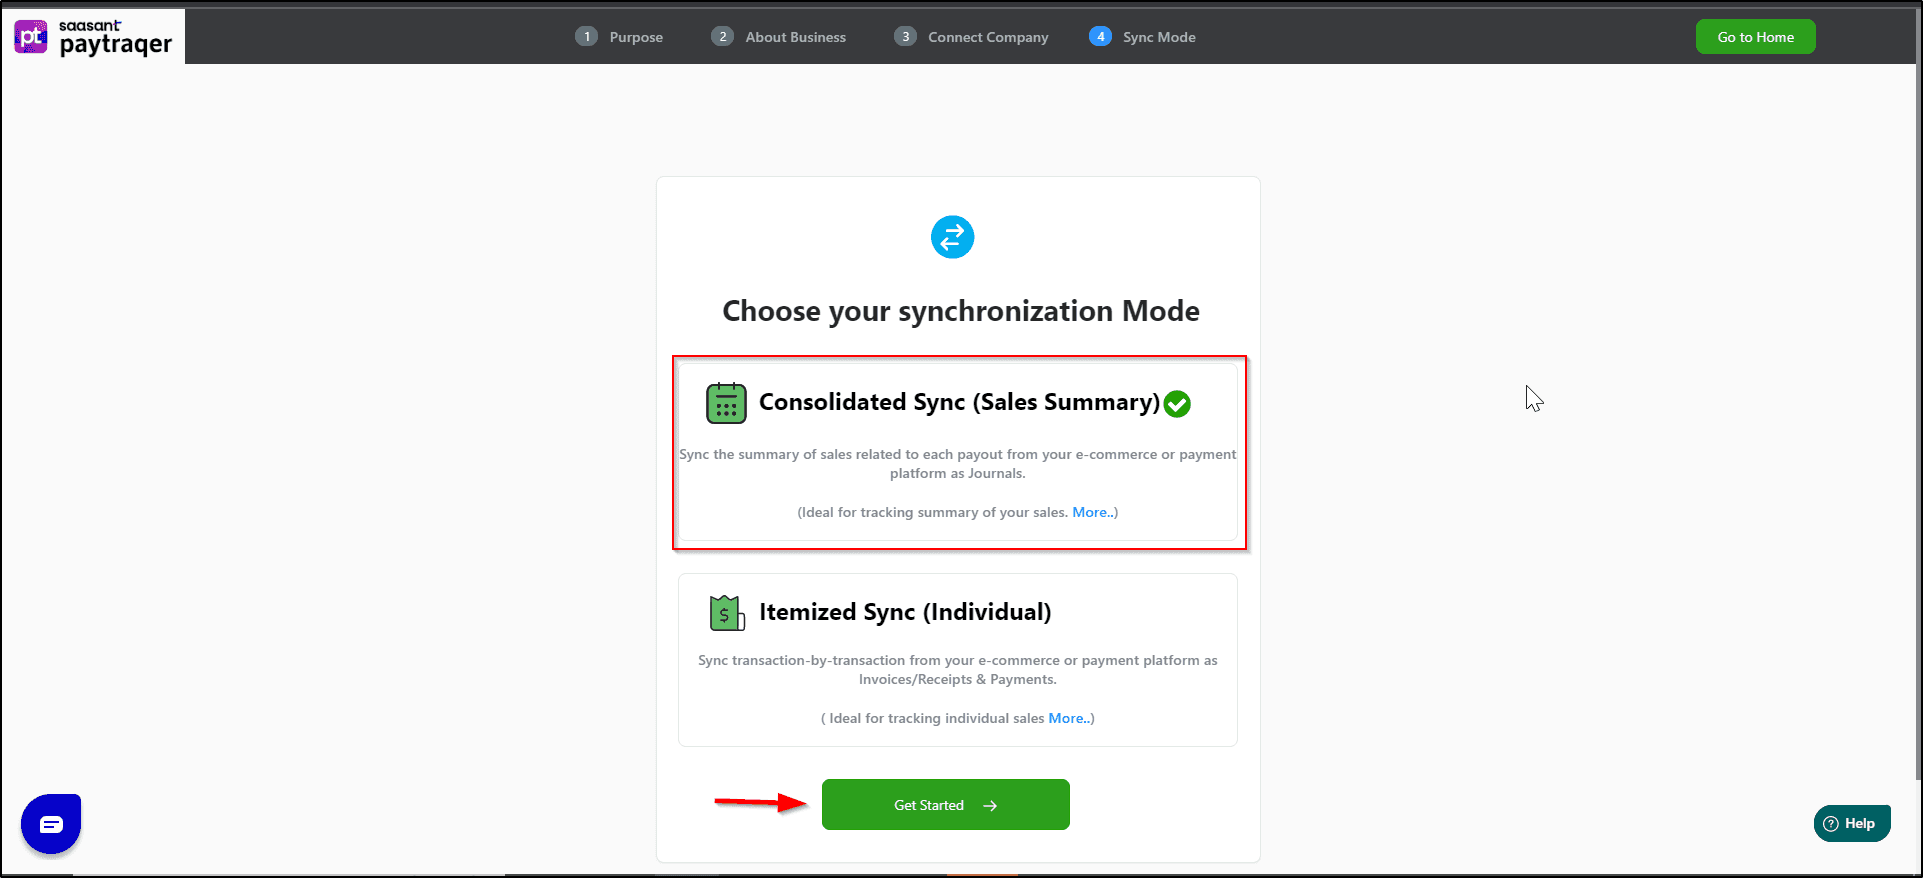
After connecting QuickBooks Online, PayTraQer asks you to choose the sync mode.
This step decides how Amazon transactions will be posted into QuickBooks.
You can choose between two sync modes:
Sync Mode | What It Means | Best For |
Consolidated Sync / Sales Summary | Amazon transactions are posted in a summarized format | Sellers who want fewer entries and faster reconciliation |
Itemized Sync / Individual | Amazon transactions are posted with detailed customer and item information | Sellers who need customer-level or item-level detail in QuickBooks |
If your main goal is clean reconciliation, consolidated sync is usually easier to manage. It reduces the number of entries posted into QuickBooks and keeps the books lighter.
If you need more detailed tracking, itemized sync gives you a deeper view of Amazon sales, customers, and products.
After choosing the preferred sync mode, click Get Started.
Step 3: Add Your Amazon Account in PayTraQer
Once QuickBooks is connected and the sync mode is selected, the next step is to connect your Amazon account.
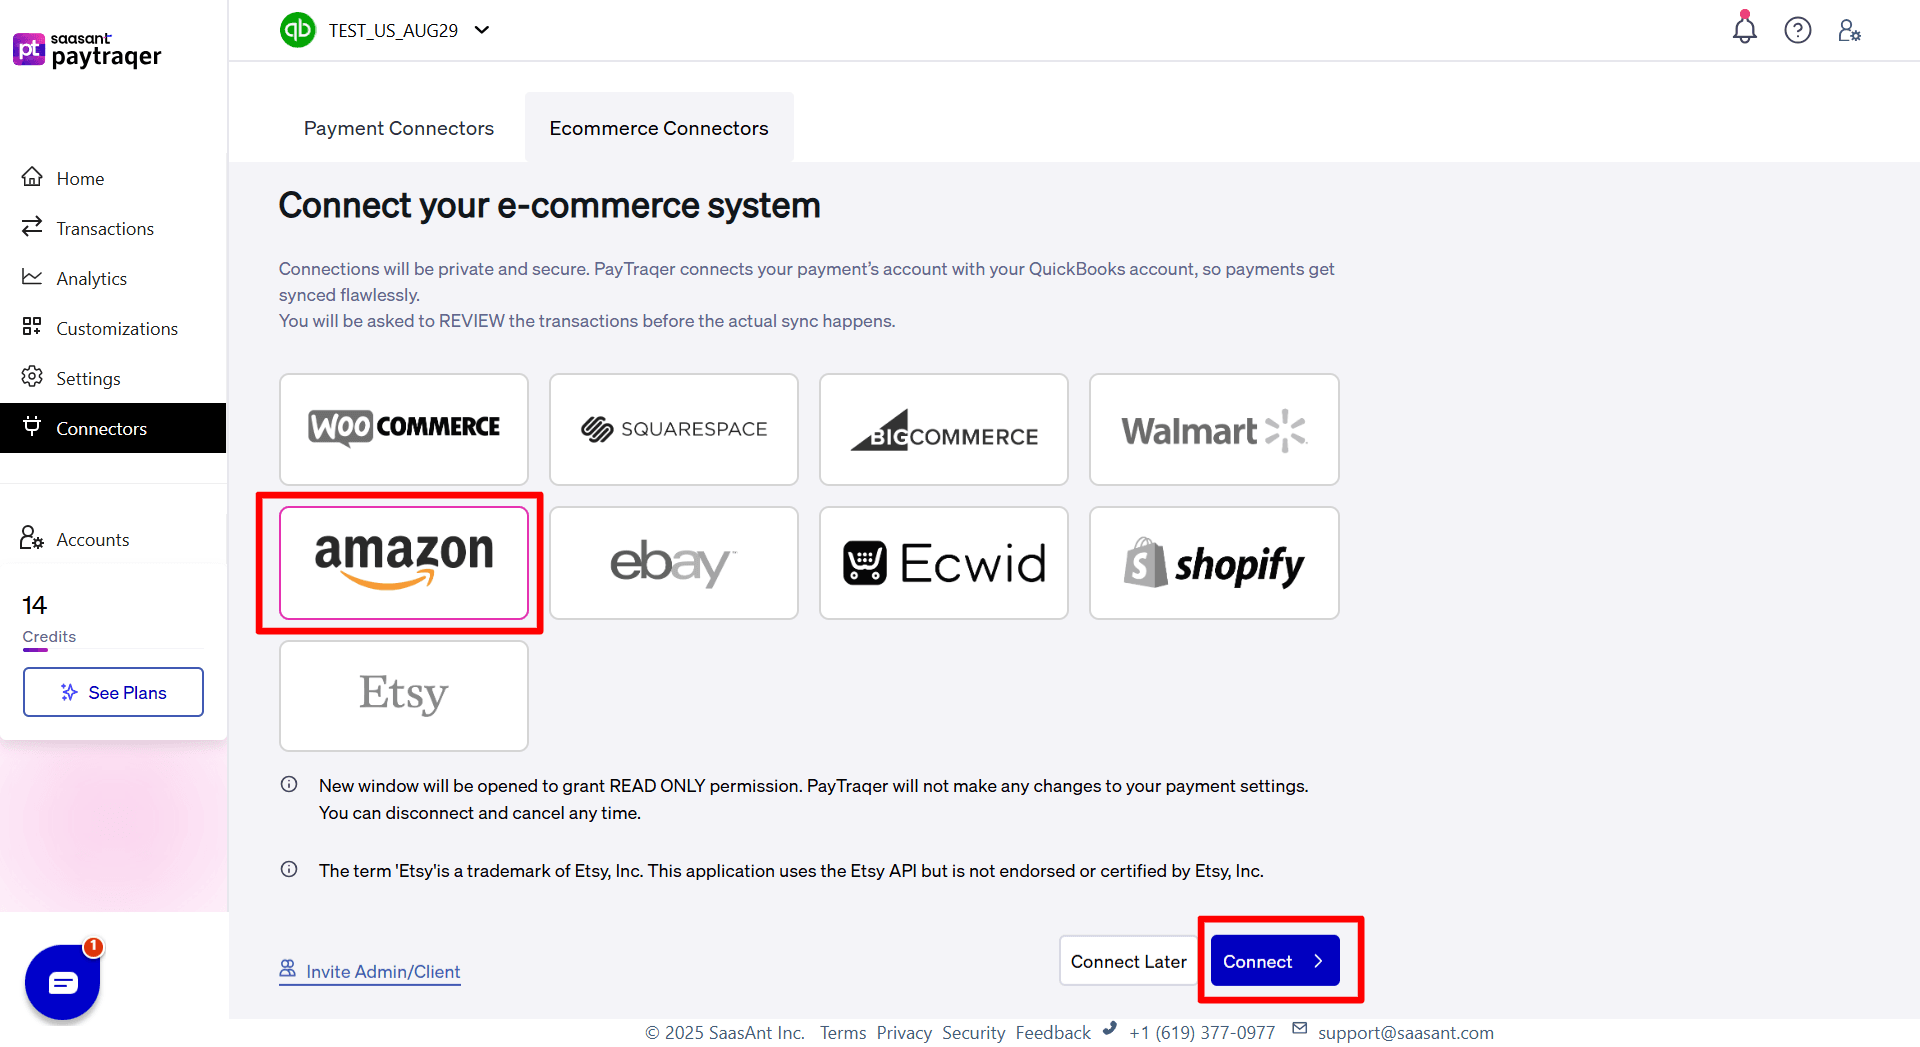
In PayTraQer, go to Connectors from the left menu.
Open the Ecommerce Connectors tab.
Click Add New.
Choose the Amazon connector.
Sign in to your Amazon account when prompted.
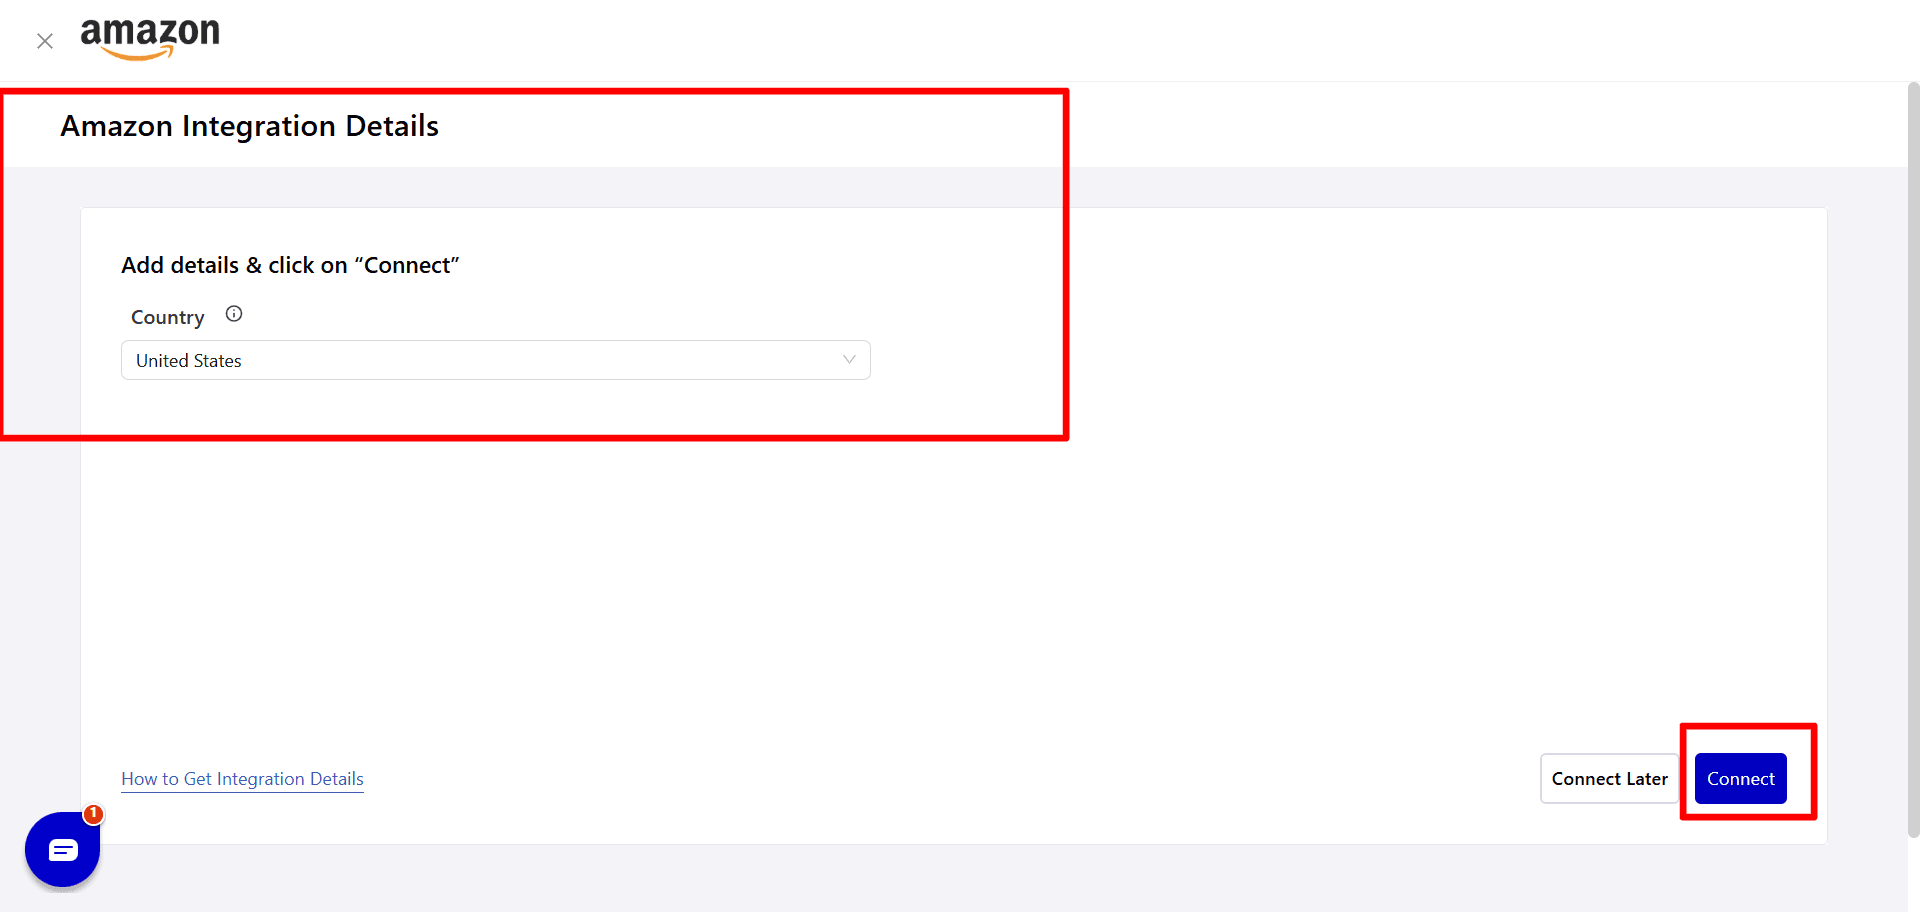
Approve the required access.
After the connection is complete, your Amazon account will appear under Ecommerce Connectors in PayTraQer.
This means PayTraQer can now access your Amazon transaction data and prepare it for QuickBooks Online syncing.
Step 4: Configure Amazon Express Settings
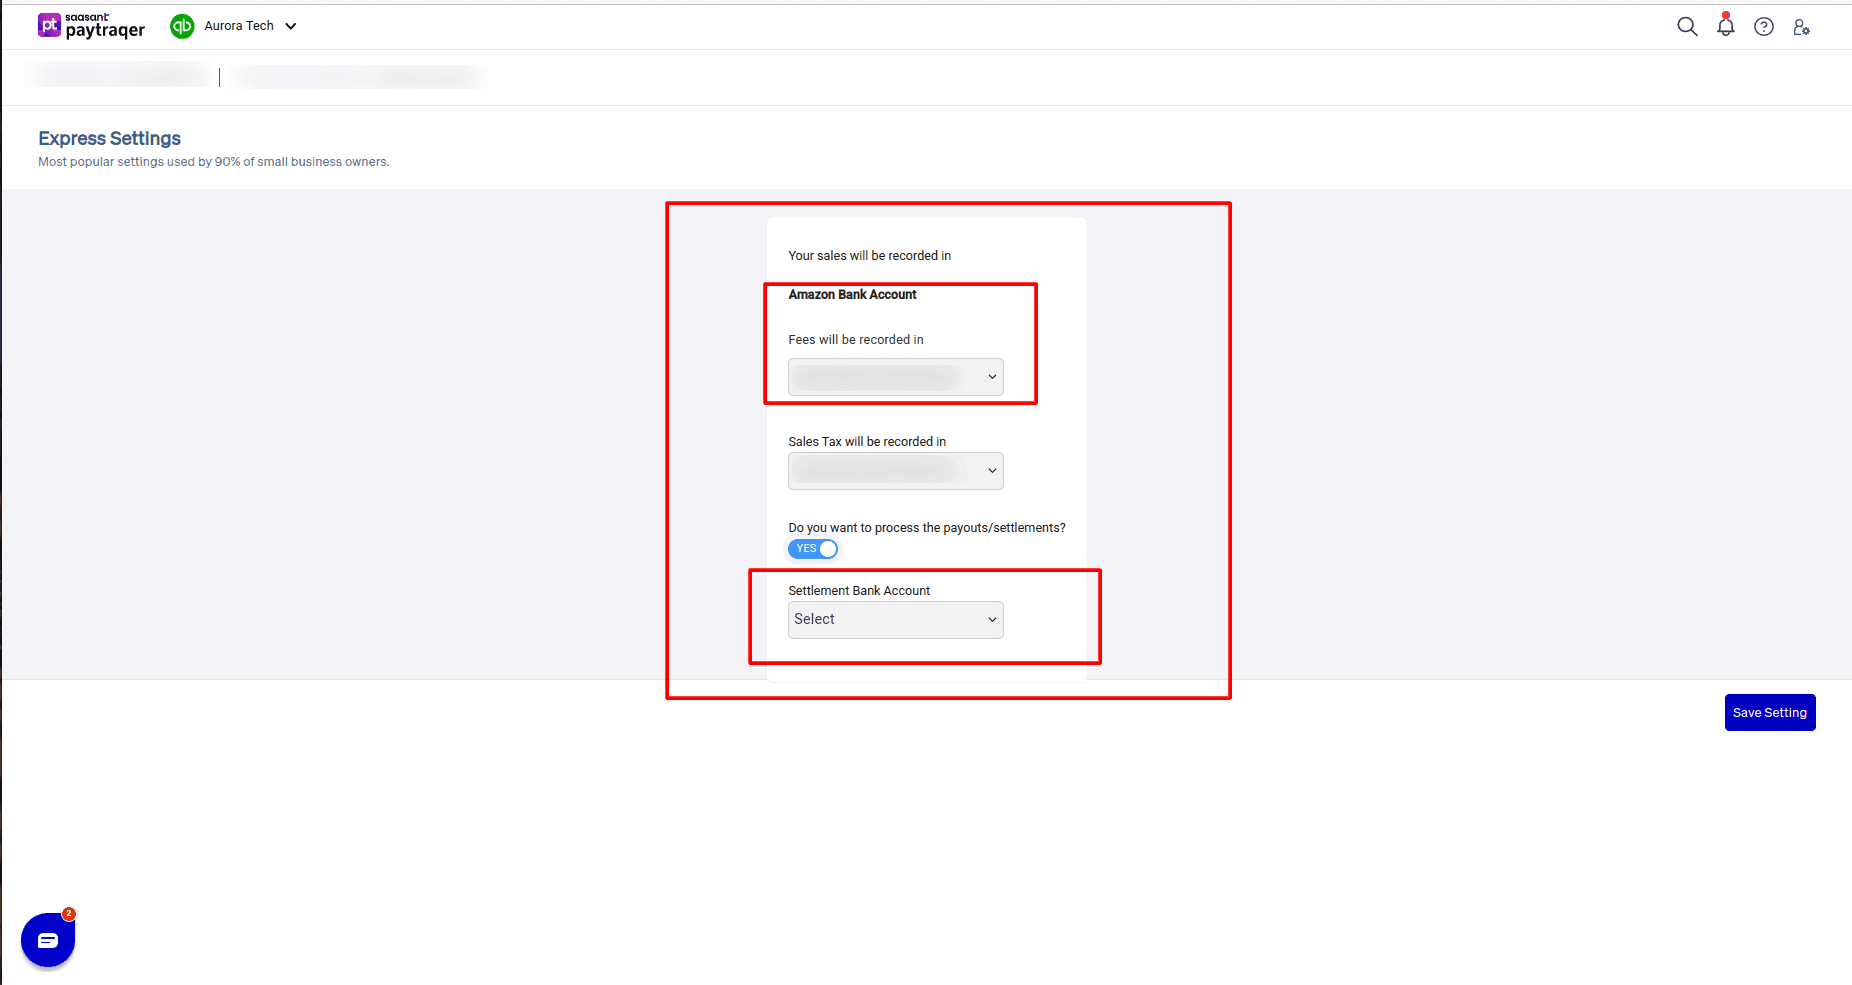
Right after connecting Amazon, PayTraQer shows the Express Settings screen.
This is the quick setup area for the most common Amazon sync settings. Instead of configuring every detailed option first, Express Settings lets you choose the main accounts needed to start syncing Amazon data into QuickBooks.
In Amazon Express Settings, you can configure the following:
Amazon Bank Account
Choose the bank or clearing account where your Amazon sales and payouts should be recorded.
Many sellers prefer using an Amazon clearing account because it helps separate Amazon activity from the actual bank deposit. Sales, fees, refunds, and payout transfers can first flow through the clearing account before the final payout reaches the real checking account.
This makes reconciliation easier because the Amazon payout is treated as a settlement transfer, not as direct income.
Fees Account
Choose the expense account where Amazon fees should be recorded.
For example, you can choose an account such as Amazon Advertisement Fees, Amazon Fees, Marketplace Fees, or another related expense account based on your chart of accounts.
This helps you track the cost of selling on Amazon instead of hiding those deductions inside the final payout amount.
Sales Tax Account
Choose the account used for Amazon tax components.
Amazon transactions may include tax-related amounts such as sales tax, shipping tax, gift wrapping tax, and withheld tax. Mapping these amounts to the right account helps you keep tax-related entries cleaner in QuickBooks.
Payout and Settlement Processing
PayTraQer also asks whether you want to process payouts or settlements.
Turn this on if you want PayTraQer to create transfer entries that move funds from your Amazon clearing account to your actual checking account.
Once enabled, choose the Settlement Bank Account where Amazon payouts land in QuickBooks.
This setting is useful because Amazon settlements are not the same as sales. The payout is the net amount after sales, fees, refunds, taxes, and adjustments are processed.
After choosing the required accounts, click Save Setting.
You can change these settings later from Settings → Amazon → Payout and Fees.
Step 5: Download Amazon Transactions
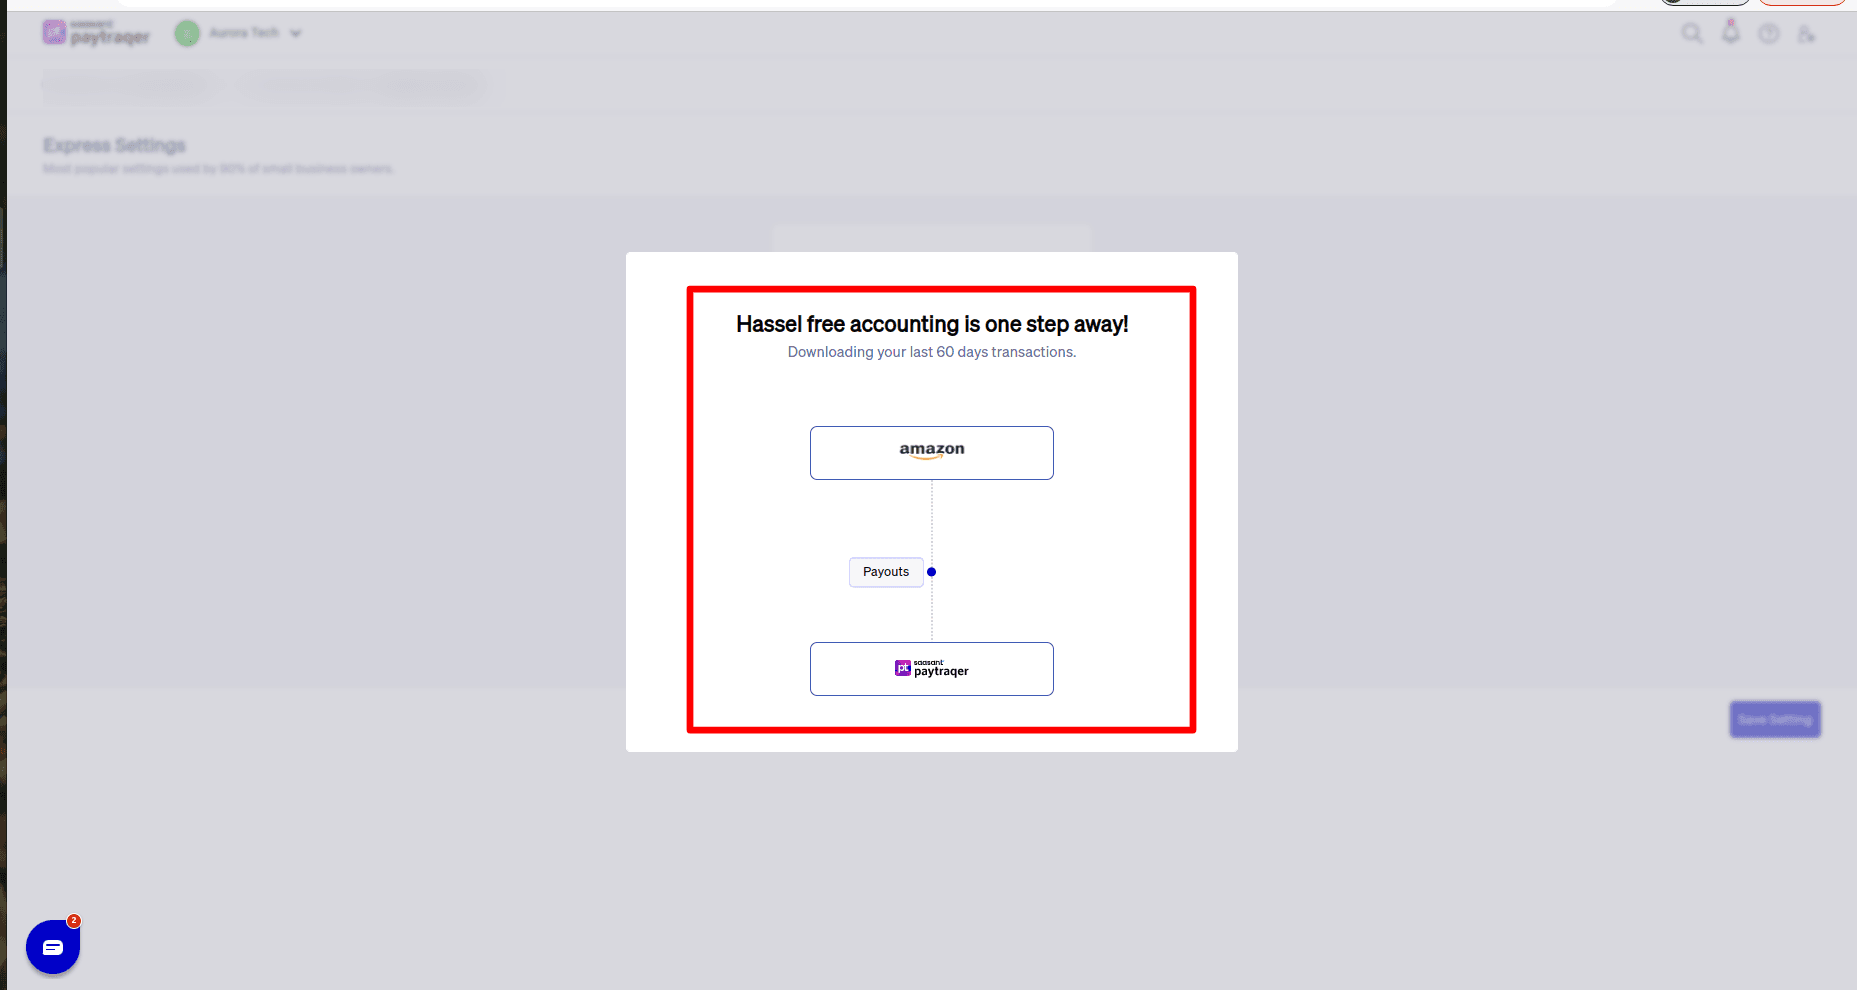
Once the Amazon connection and basic settings are ready, PayTraQer starts bringing in your Amazon data.
After connecting Amazon, PayTraQer automatically downloads the last 60 days of Amazon transactions.
You can view the imported records under:
Transactions → Review
If you need older Amazon data, use the Download Historical Transactions option from the Transactions screen.

This is helpful when you are moving from manual Amazon bookkeeping to automated syncing and want to bring past transactions into QuickBooks Online.
Step 6: Enable Auto Sync for New Amazon Transactions
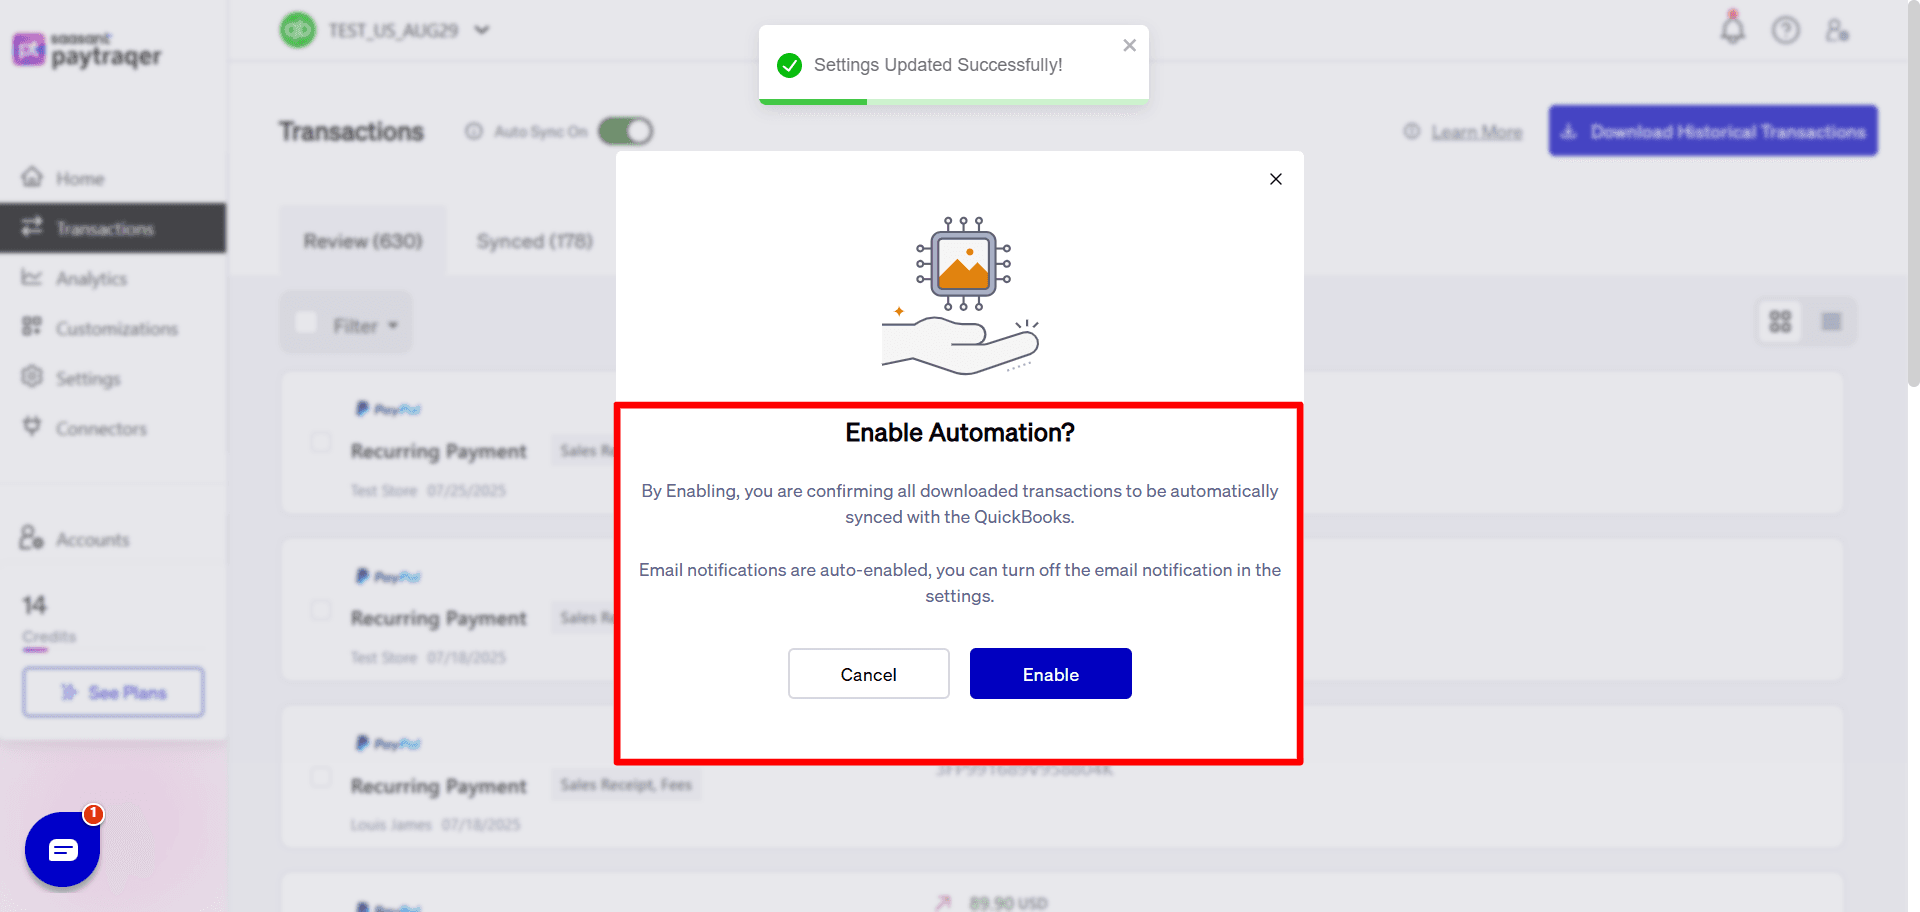
PayTraQer also supports Auto Sync.
When Auto Sync is enabled, PayTraQer regularly downloads and syncs new Amazon transactions with QuickBooks Online based on your settings.
This helps reduce repeated manual work. Instead of downloading Amazon data every time, you can allow PayTraQer to keep bringing in new records automatically.
Even when Auto Sync is enabled, it is still a good practice to review the setup and check sync history regularly to make sure the data is moving correctly.
Step 7: Fine-Tune Amazon Sync Settings
Express Settings helps you get started quickly. But if you want more control over how Amazon transactions are posted in QuickBooks, PayTraQer gives you detailed Amazon sync settings.
To access these settings:
Go to Settings from the left menu.
Choose Amazon from the connector list.
Use the available tabs to configure Sales, Product & Services, Tax, Fees, Payout, and Payment Processors.
These settings control how Amazon sales, items, taxes, fees, payouts, and related entries are created in QuickBooks Online.
Sales Settings
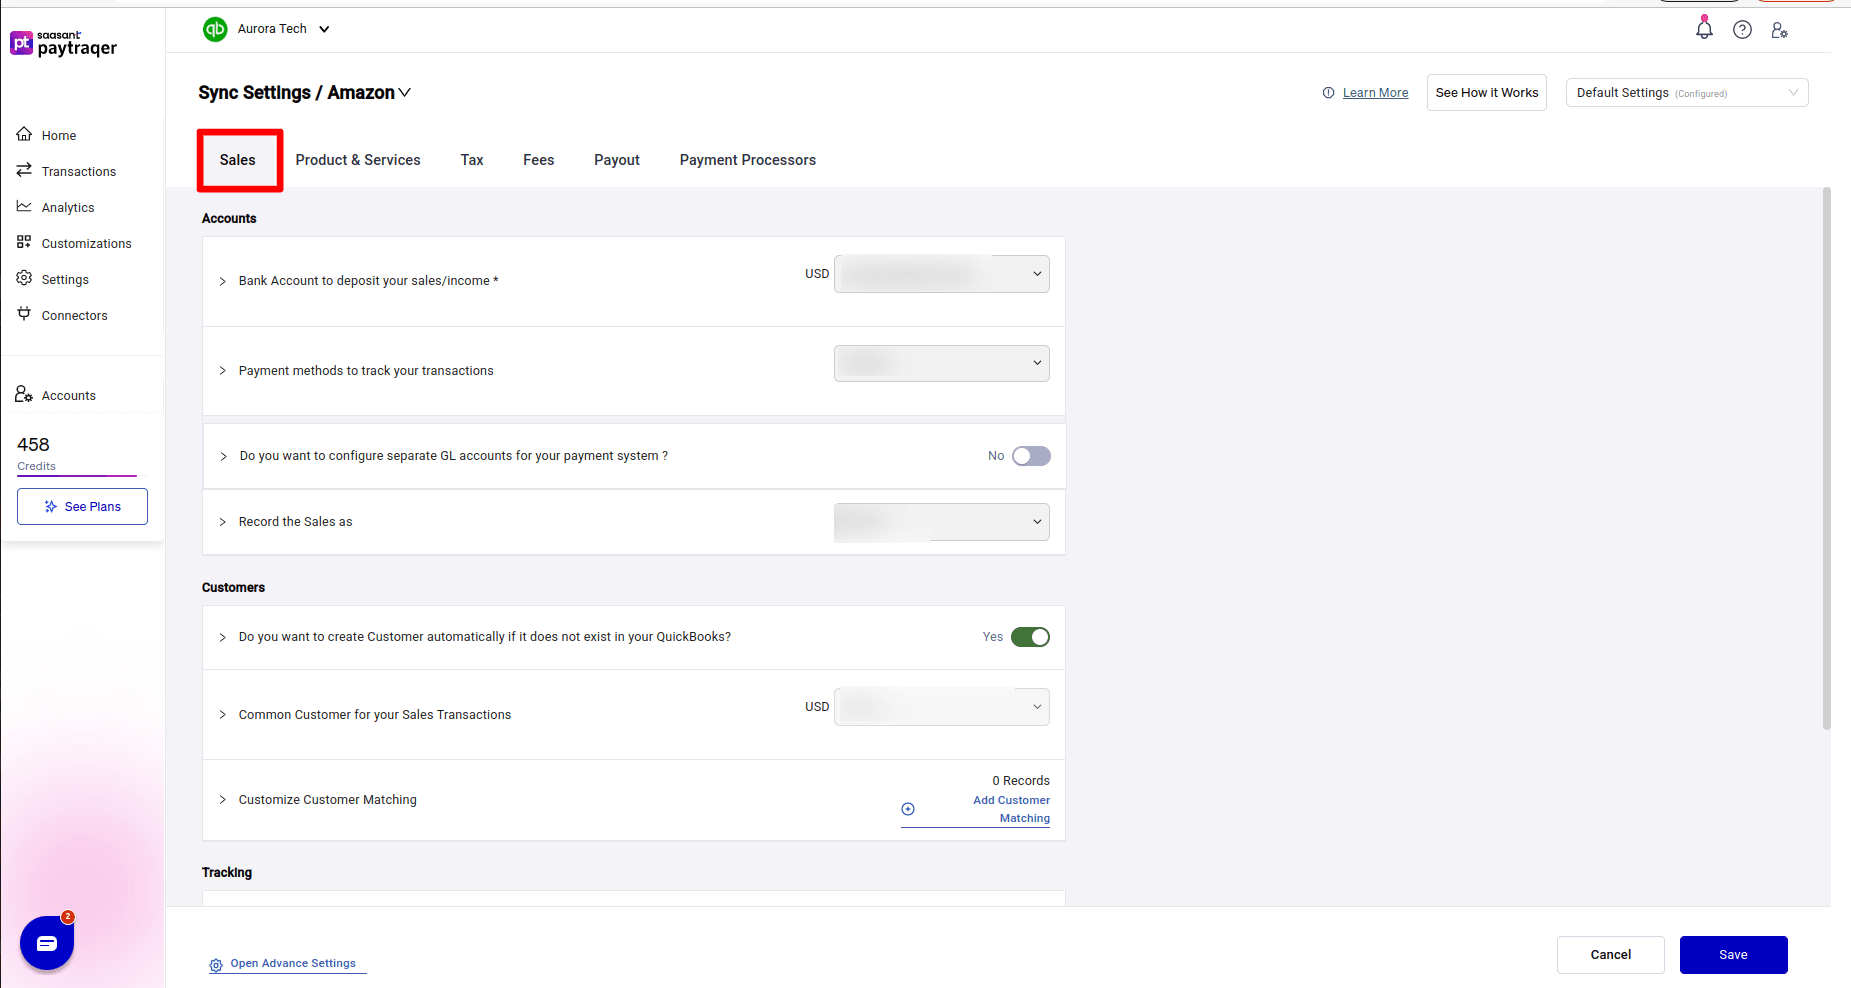
The Sales Settings section controls how Amazon sales transactions are recorded in QuickBooks.
Accounts
In the Accounts section, choose the bank or clearing account where Amazon sales or income entries should be posted.
For most Amazon workflows, this can be your Amazon clearing account. This keeps Amazon sales activity separate from the actual bank deposit and helps with settlement matching.
You can also choose the payment method for Amazon transactions. Selecting Amazon as the payment method keeps all Amazon sales consistent in QuickBooks.
PayTraQer also lets you choose how Amazon sales should be recorded. Based on your workflow, you can post Amazon sales as either invoices or sales receipts.
Customers
In the Customers section, you can decide how Amazon buyers should be handled in QuickBooks.
If you want PayTraQer to create customers automatically when a match is not found, you can turn on automatic customer creation.
If you do not want separate customers for every Amazon buyer, you can use a common customer for all Amazon sales. For example, you can record all sales under a customer such as Amazon Marketplace Customer.
This is useful when you do not need buyer-level reporting and want to keep your QuickBooks customer list clean.
You can also customize customer matching rules. This allows you to map Amazon buyer names to preferred customer names in QuickBooks.
Tracking
If you use classes, locations, or departments in QuickBooks, you can assign them to Amazon sales transactions.
For example, you can set a fixed location for Amazon sales or assign a class to track Amazon activity separately in reports.
This is useful for sellers or accountants who want to compare Amazon sales with other sales channels.
Sync
PayTraQer also gives you the option to skip sales and process only the associated fees.
This is useful if you already record sales through another workflow but still want Amazon fees to be synced into QuickBooks.
Product and Service Settings

The Product and Service Settings section controls how Amazon items are matched or created in QuickBooks.
Auto Creation
You can allow PayTraQer to create products or services automatically when an exact match does not exist in QuickBooks.
This is helpful when Amazon item names do not already exist in your QuickBooks product and service list.
You can also choose the type of item PayTraQer should create automatically. For example, you can choose Non Inventory or Service based on how you track Amazon items.
Then, select the income account that should be used for auto-created products or services, such as Sales of Product Income.
Match Product
PayTraQer can match Amazon products with QuickBooks items based on product name.
If your Amazon item names and QuickBooks item names are different, you can customize product matching rules. This helps avoid duplicate item creation and keeps your item list cleaner.
Common Item
If you do not need product-level reporting, you can use one common product or service for all Amazon sales.
For example, instead of creating or matching every Amazon item separately, you can post all sales to a default item such as Amazon Sales.
This works well for sellers who care more about settlement reconciliation and sales totals than individual item tracking inside QuickBooks.
Tax Settings
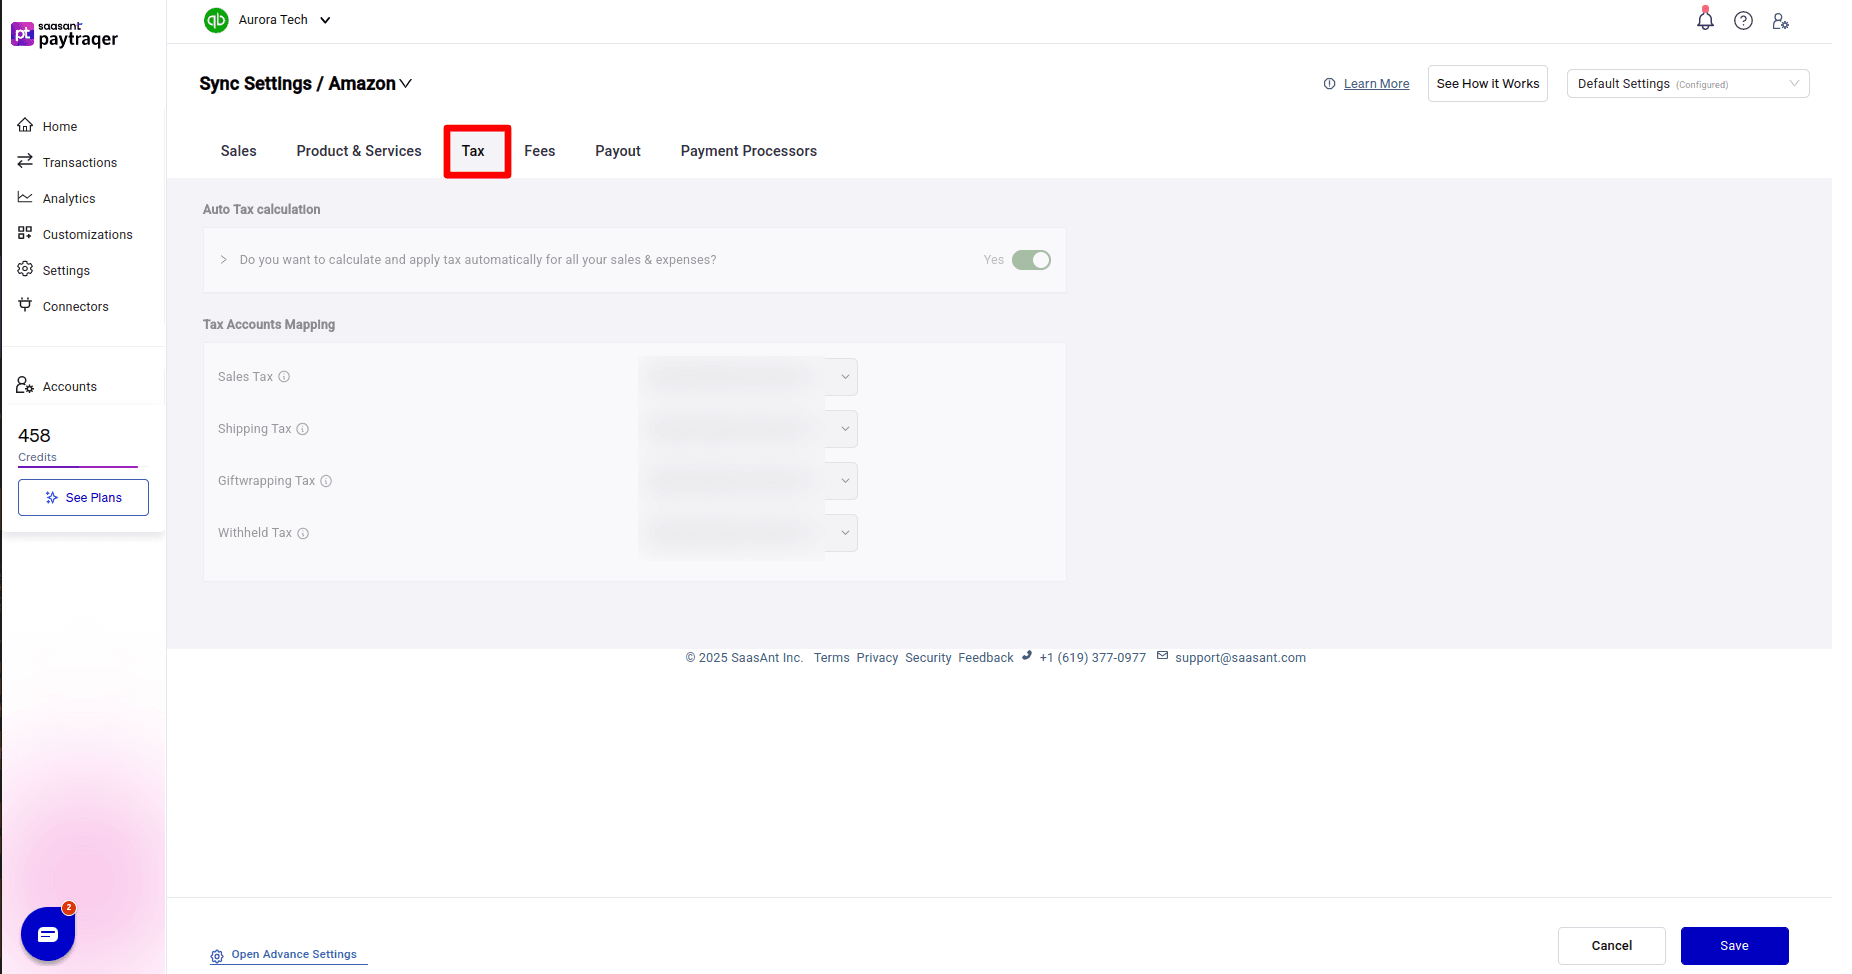
The Tax Settings section controls how Amazon tax amounts are handled in QuickBooks.
You can turn on automatic tax calculation for Amazon sales and related expenses.
You can also map different tax components from Amazon settlements to the correct QuickBooks accounts.
Common Amazon tax components include:
Sales Tax
Shipping Tax
Gift Wrapping Tax
Withheld Tax
Each tax component should be mapped to the correct account based on your accounting setup.
This step is important because tax amounts should not be treated as regular income. Proper tax mapping helps keep your QuickBooks reports cleaner and easier to review.
Fees Settings
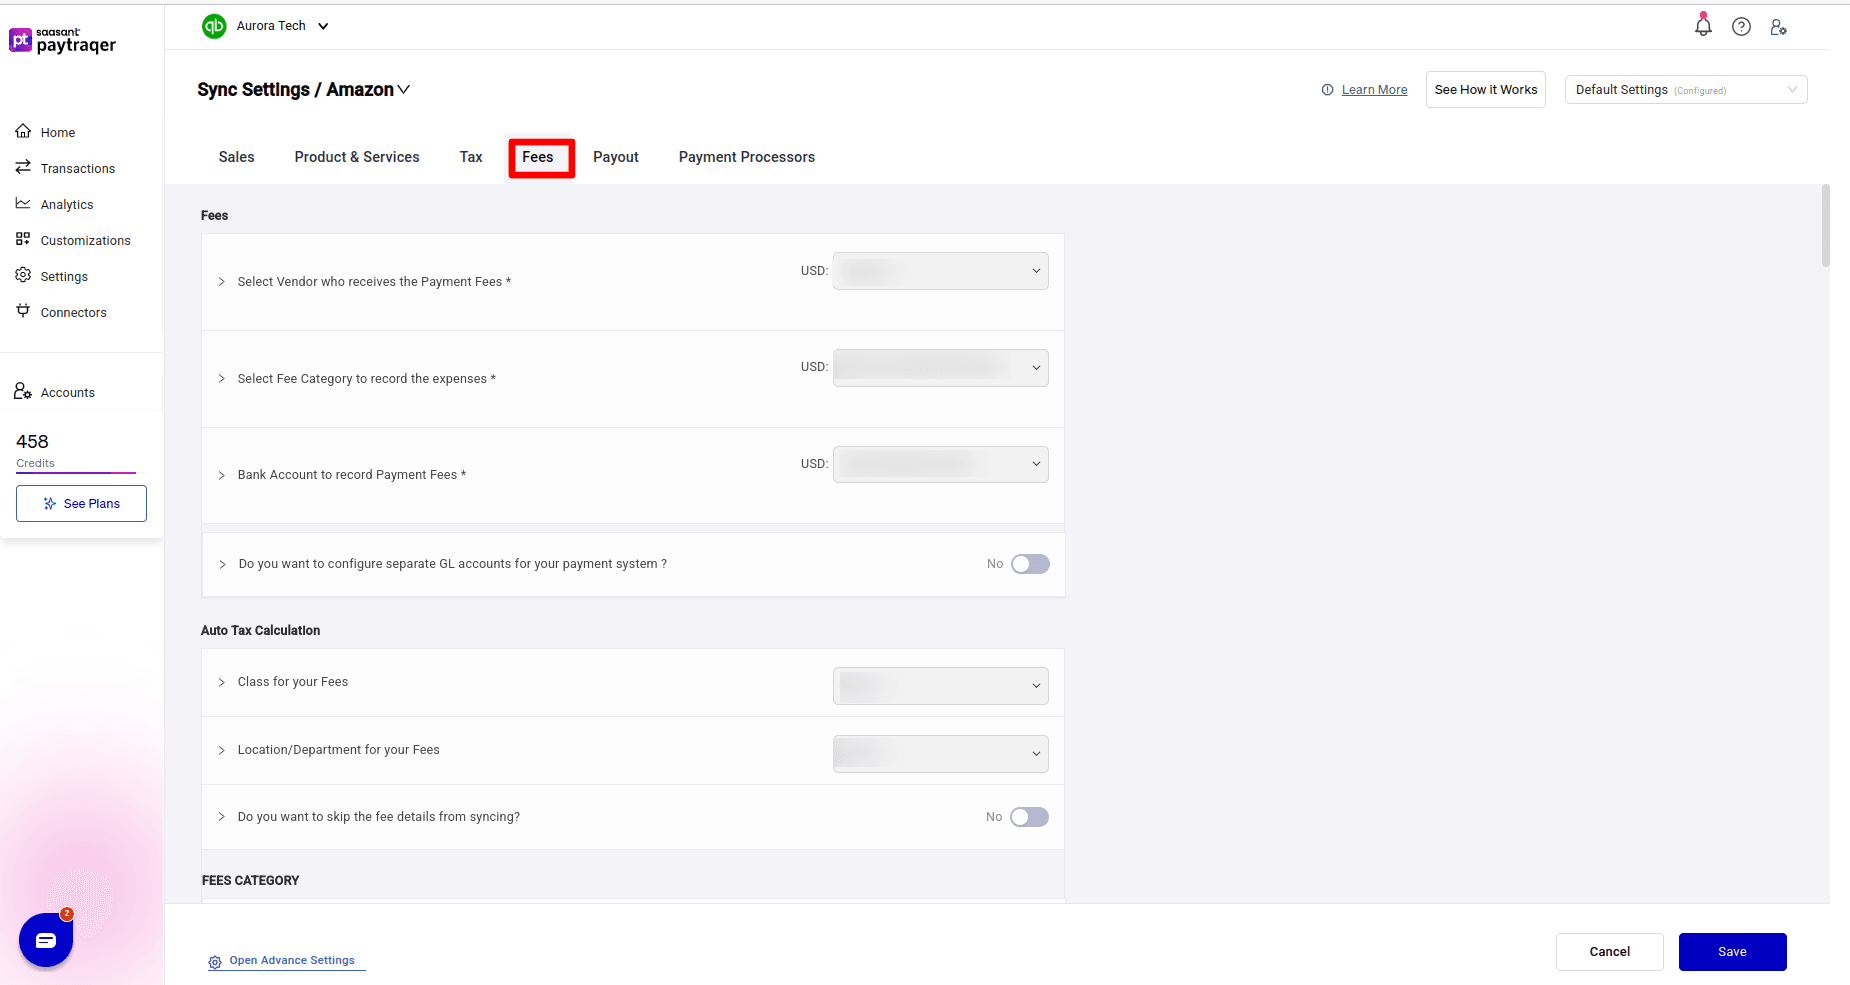
Amazon fees are one of the biggest reasons Amazon payouts do not match sales totals.
The Fees Settings section helps you control how those fees are recorded in QuickBooks.
Fee Vendor
Choose the vendor who receives the payment fees.
For Amazon, this is usually set as Amazon. This keeps Amazon fee expenses connected to the Amazon vendor in QuickBooks.
Fee Category
Choose the expense account where Amazon fees should be recorded.
This can be an account such as Amazon Advertisement Fees, Amazon Fees, Marketplace Fees, or any fee-related expense account you use in QuickBooks.
Bank or Clearing Account for Fees
Select the bank or clearing account used to record payment fee entries.
If you use an Amazon clearing account, fees can be recorded against that account so they reduce the Amazon balance before the payout is transferred to your bank.
Separate GL Accounts for Fee Types
PayTraQer also lets you configure separate general ledger accounts for different fee types.
This is useful if you want to track Amazon fees in more detail instead of posting all fees to one expense account.
You can map fee categories such as:
Commission Fee
Fixed Closing Fee
Referral Fee
Variable Closing Fee
Subscription
Each category can be assigned to the right expense account in QuickBooks.
Fee Tracking
If you use class or location tracking, you can assign a class or location to Amazon fee expenses.
This helps you report Amazon-related fees separately from other channels.
Skip Fee Details
If you do not need every fee broken out, you can choose to skip detailed fee syncing.
This is useful when you only want summary-level data and do not need every individual fee category posted separately.
Payout Settings
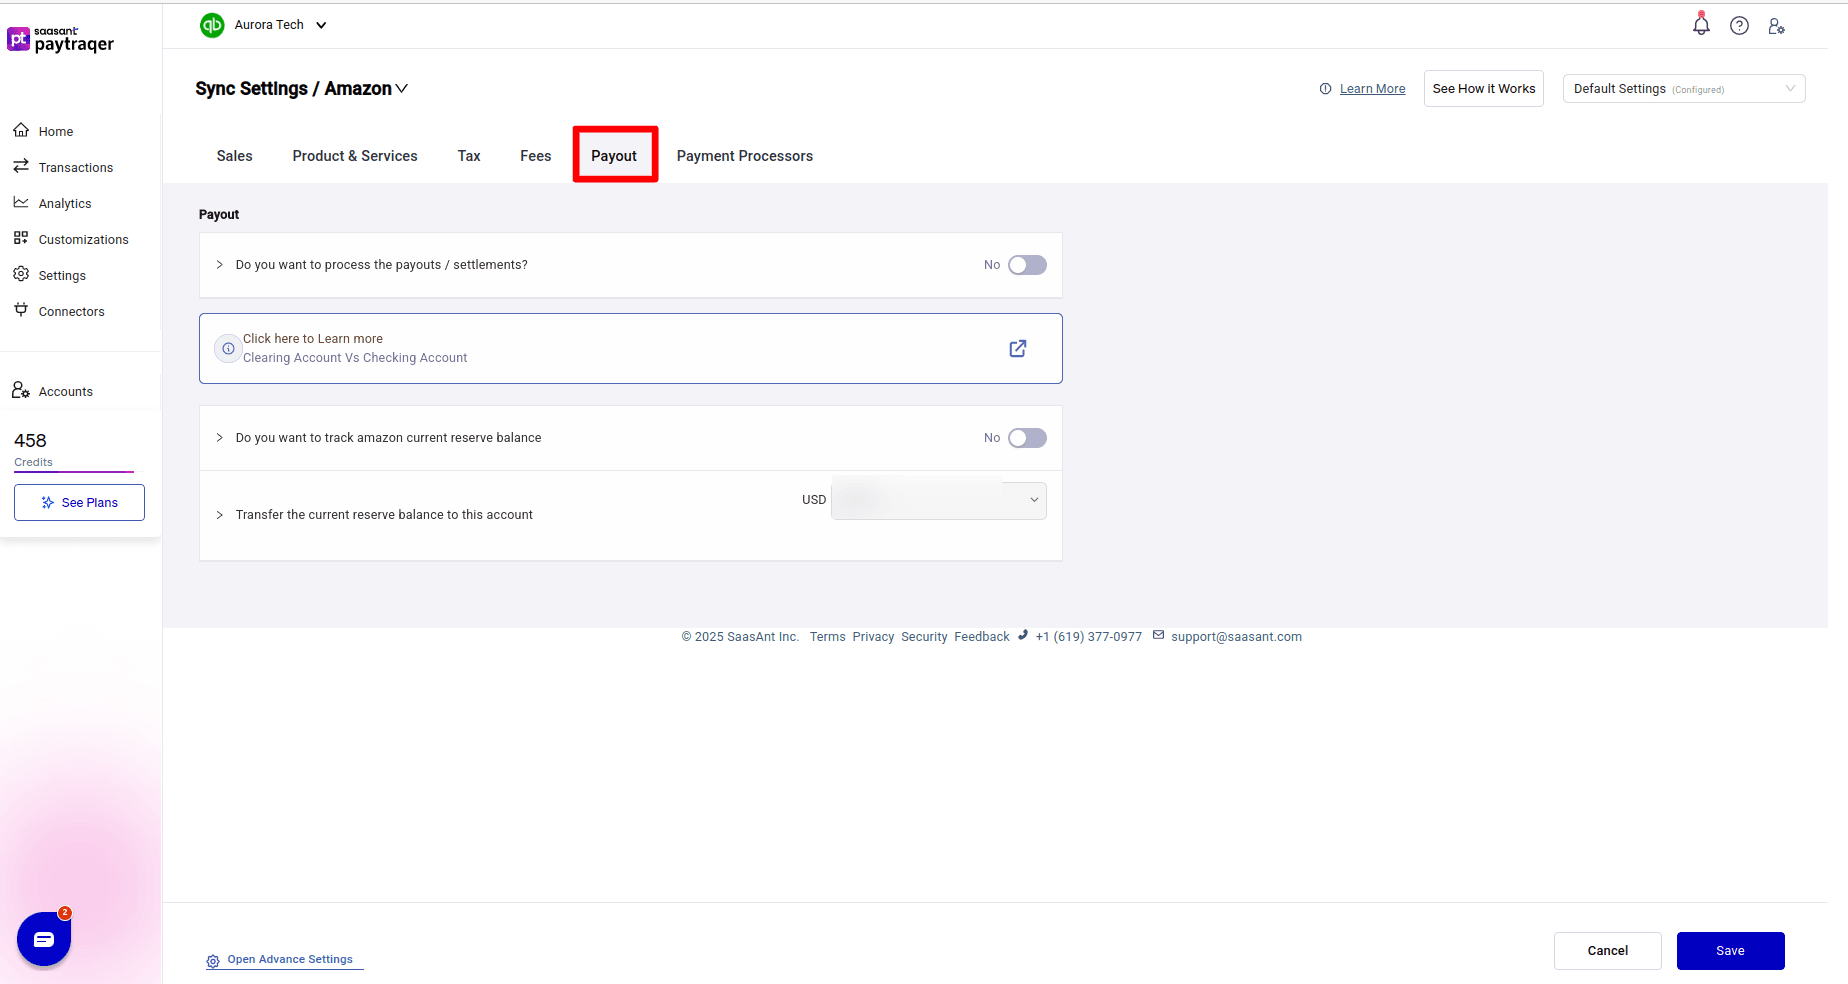
The Payout Settings section controls how Amazon settlements and reserve balances are recorded.
Process Payouts and Settlements
Turn on payout or settlement processing if you want PayTraQer to sync each Amazon settlement as a transfer from your Amazon clearing account to your settlement bank account in QuickBooks.
This helps match the final Amazon payout with the deposit in your bank feed.
Instead of recording the deposit as income, PayTraQer treats it as a movement of funds from the Amazon clearing account to the actual bank account.
Track Amazon Reserve Balance
Amazon may hold a reserve balance and release it later.
PayTraQer allows you to track the current Amazon reserve balance. You can also choose the account where reserve transfers should be posted when Amazon releases funds.
This helps explain why a payout may not fully match the expected sales amount.
Final Thoughts
Connecting Amazon with QuickBooks Online is not just about sending sales data from one system to another.
It is about recording Amazon activity in a way that makes sense for bookkeeping. Sales, fees, refunds, taxes, reserves, and payouts all need to be handled correctly if you want your QuickBooks reports to reflect what is actually happening in your Amazon business.
PayTraQer helps simplify this process by connecting Amazon with QuickBooks Online, downloading Amazon transactions, mapping accounts, syncing sales and fees, processing payouts, and giving you a clear sync history.
With the right setup, Amazon bookkeeping becomes easier to manage, easier to review, and easier to reconcile in QuickBooks Online.
FAQs
1. Can I connect Amazon with QuickBooks Online using PayTraQer?
Yes. PayTraQer lets you connect Amazon with QuickBooks Online and sync Amazon sales, settlements, fees, taxes, refunds, and payouts into QuickBooks.
2. Does PayTraQer download Amazon transactions automatically?
Yes. After connecting Amazon, PayTraQer automatically downloads the last 60 days of Amazon transactions. You can also use Download Historical Transactions to bring in older data.
3. Can I sync Amazon payouts to QuickBooks?
Yes. PayTraQer can process Amazon payouts or settlements by creating transfer entries from the Amazon clearing account to the actual settlement bank account in QuickBooks.
4. What is the best sync mode for Amazon sellers?
Consolidated Sync is useful if you want fewer entries and faster reconciliation. Itemized Sync is better if you need detailed customer and item-level information in QuickBooks.
5. Can PayTraQer sync Amazon fees to QuickBooks?
Yes. PayTraQer can sync Amazon fees and map them to the selected expense accounts. You can also configure separate accounts for different fee types.
6. Can I map Amazon taxes in PayTraQer?
Yes. PayTraQer allows you to map Amazon tax components such as sales tax, shipping tax, gift wrapping tax, and withheld tax to the correct QuickBooks accounts.
7. Can I review Amazon transactions before syncing?
Yes. PayTraQer lets you review downloaded Amazon transactions under Transactions → Review before syncing them into QuickBooks.
8. Can I undo synced Amazon transactions?
Yes. If you need to roll back a sync, you can use the Undo button from the Synced list to delete the QuickBooks entries created by PayTraQer.
9. Should I use a clearing account for Amazon in QuickBooks?
Yes, using an Amazon clearing account is recommended because it helps track sales, fees, refunds, taxes, and payouts before the final deposit reaches your bank.
10. How do I check whether Amazon transactions synced correctly?
You can check the Synced tab and the Sync History tab in PayTraQer. These sections show synced records, created QuickBooks entries, totals, and failed sync counts.