Integrating PinPayments with QuickBooks Using PayTraQer: A Complete Guide
Handling PinPayments transactions in QuickBooks Online can soon become overwhelming when every sale, fee, and refund has to be tracked by hand. As your business develops, the bookkeeping can become increasingly messy. This is why integrating PinPayments with QuickBooks through PayTraQer is a significant advancement. This streamlined connection eliminates repetitive data entry, guarantees accuracy, and keeps your financial records perfectly in sync with your actual payment flow. If you are an accountant in need of organized ledgers or a business owner seeking clarity, this integration ensures a more efficient and dependable accounting process without the common stress or disarray.
This blog is ideal for E-commerce merchants, accountants, and developing small businesses utilizing PinPayments need reliable, automated QuickBooks syncing to avoid manual bookkeeping, enhance reconciliation, decrease errors, and ensure clean, audit-ready financial records effortlessly.
Contents
How to Integrate PinPayments with QuickBooks Online using PayTraQer (Step-by-Step Guide)
Why PayTraQer is the Best Choice for PinPayments–QuickBooks Integration
Wrap Up
Frequently Asked Questions
How to Integrate PinPayments with QuickBooks Online using PayTraQer (Step-by-Step Guide)
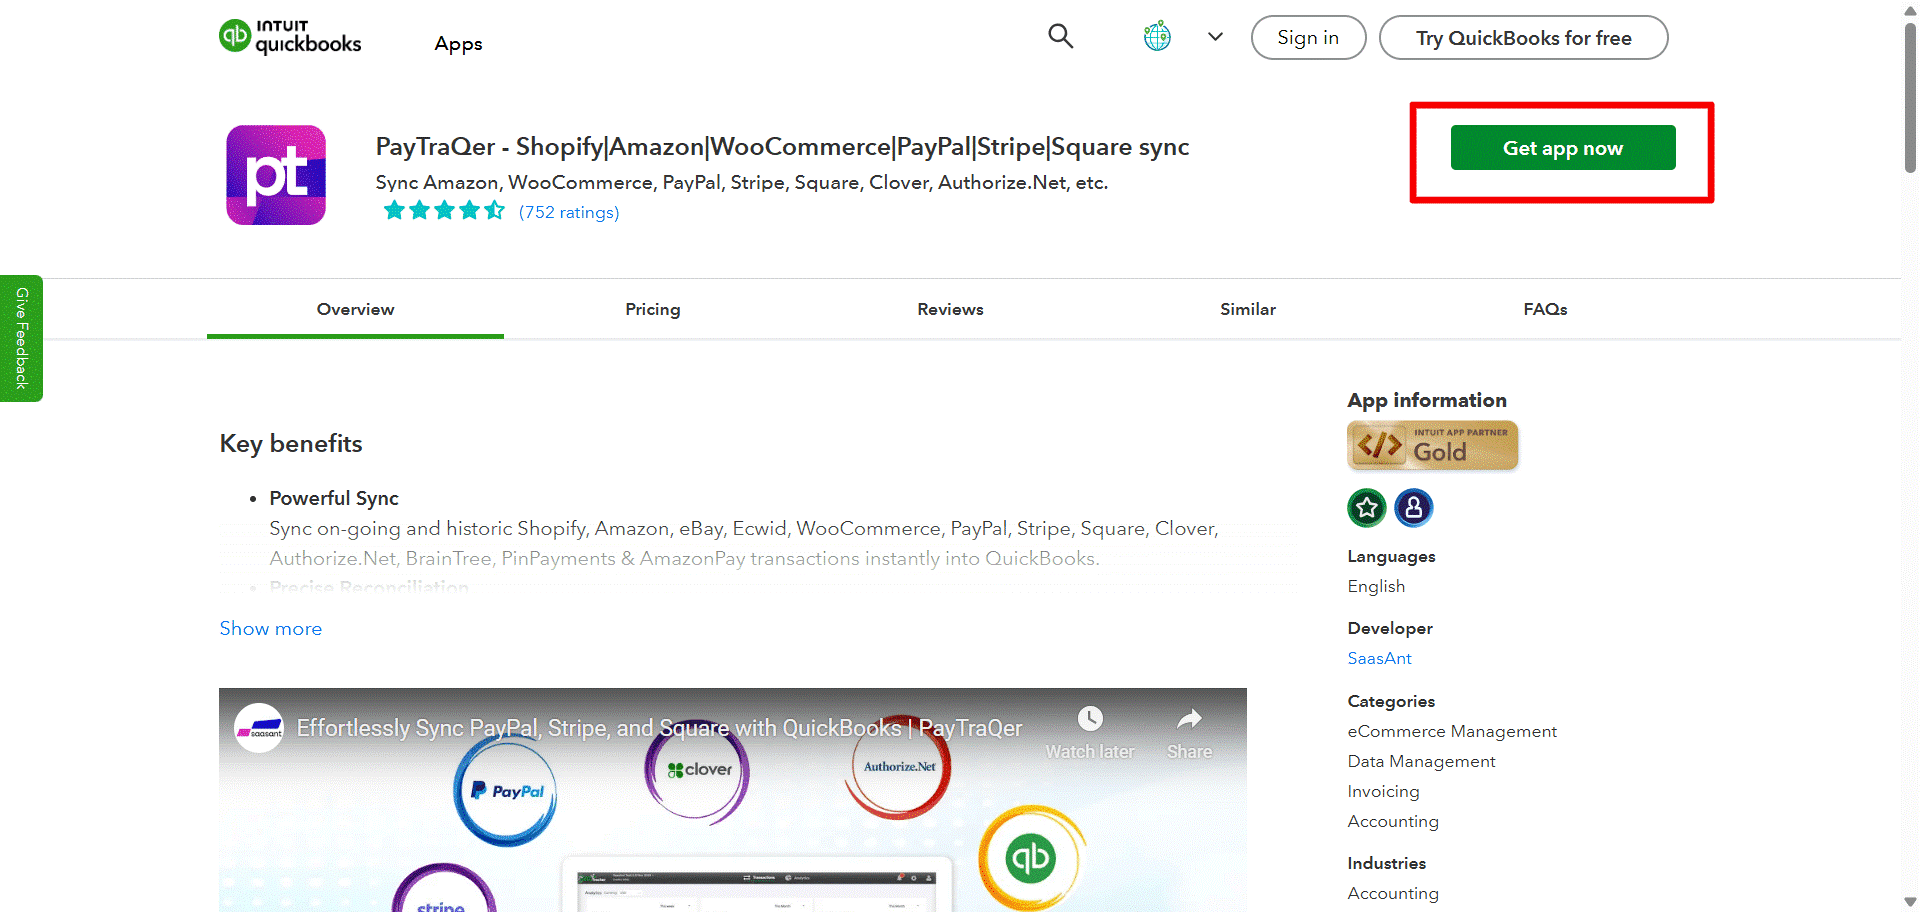
Step 1: Install PayTraQer from the QuickBooks App Store
Sign in to your QuickBooks Online account.
Go to the Apps menu on the left side.
Look for PayTraQer and click on Get App Now.
Follow the instructions to authorize and permit PayTraQer to link with your QuickBooks company file.
Step 2: Launch PayTraQer and Complete Initial Setup
After installation, launch PayTraQer from the Apps menu.
Select your QuickBooks company and verify the access permissions.
PayTraQer will assist you with an initial onboarding process to establish your syncing preferences.
This helps PayTraQer to understand your recording and tracking requirements.
Step 3: Connect Your PinPayments Seller Account to PayTraQer
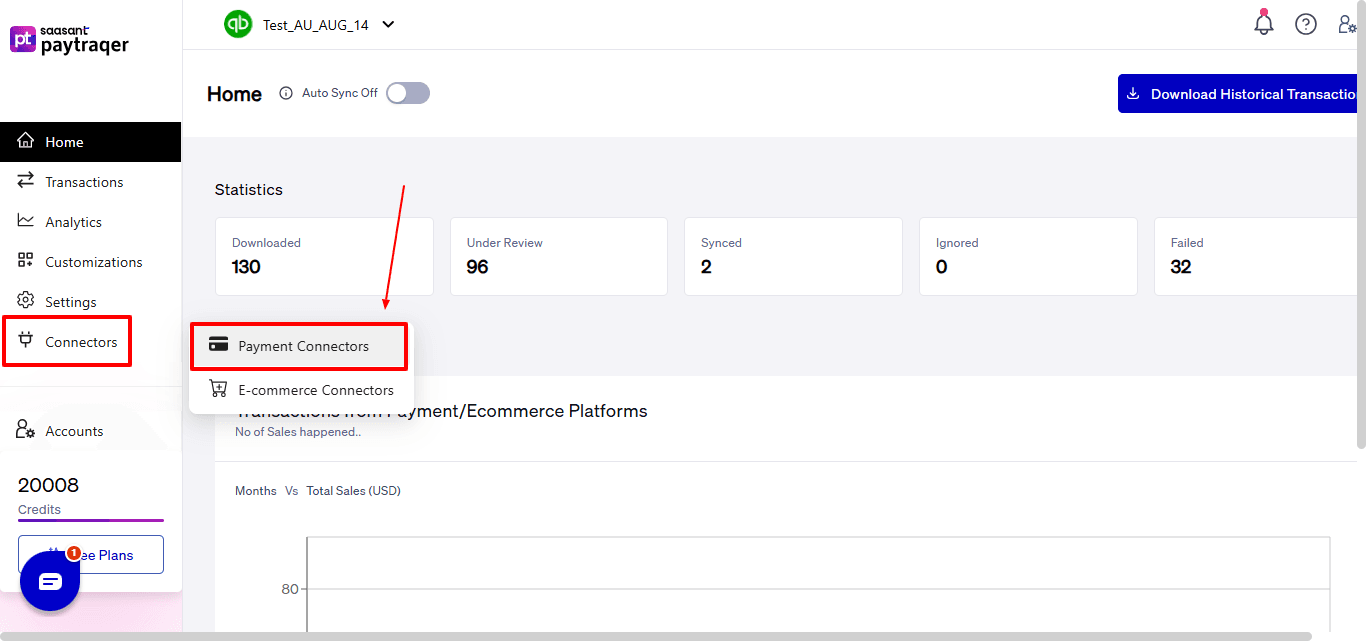
Select the “Connectors” option seen on the left side of the PayTraQer dashboard. Now, select “Payment Connectors” from the dropdown.
Choose PinPayments from the list of supported payment and sales channels.
Choose one of the following methods based on your administrative access to PinPayments:
If You Are the PinPayments Admin:
Select the Connect button visible on the PinPayments connector card.
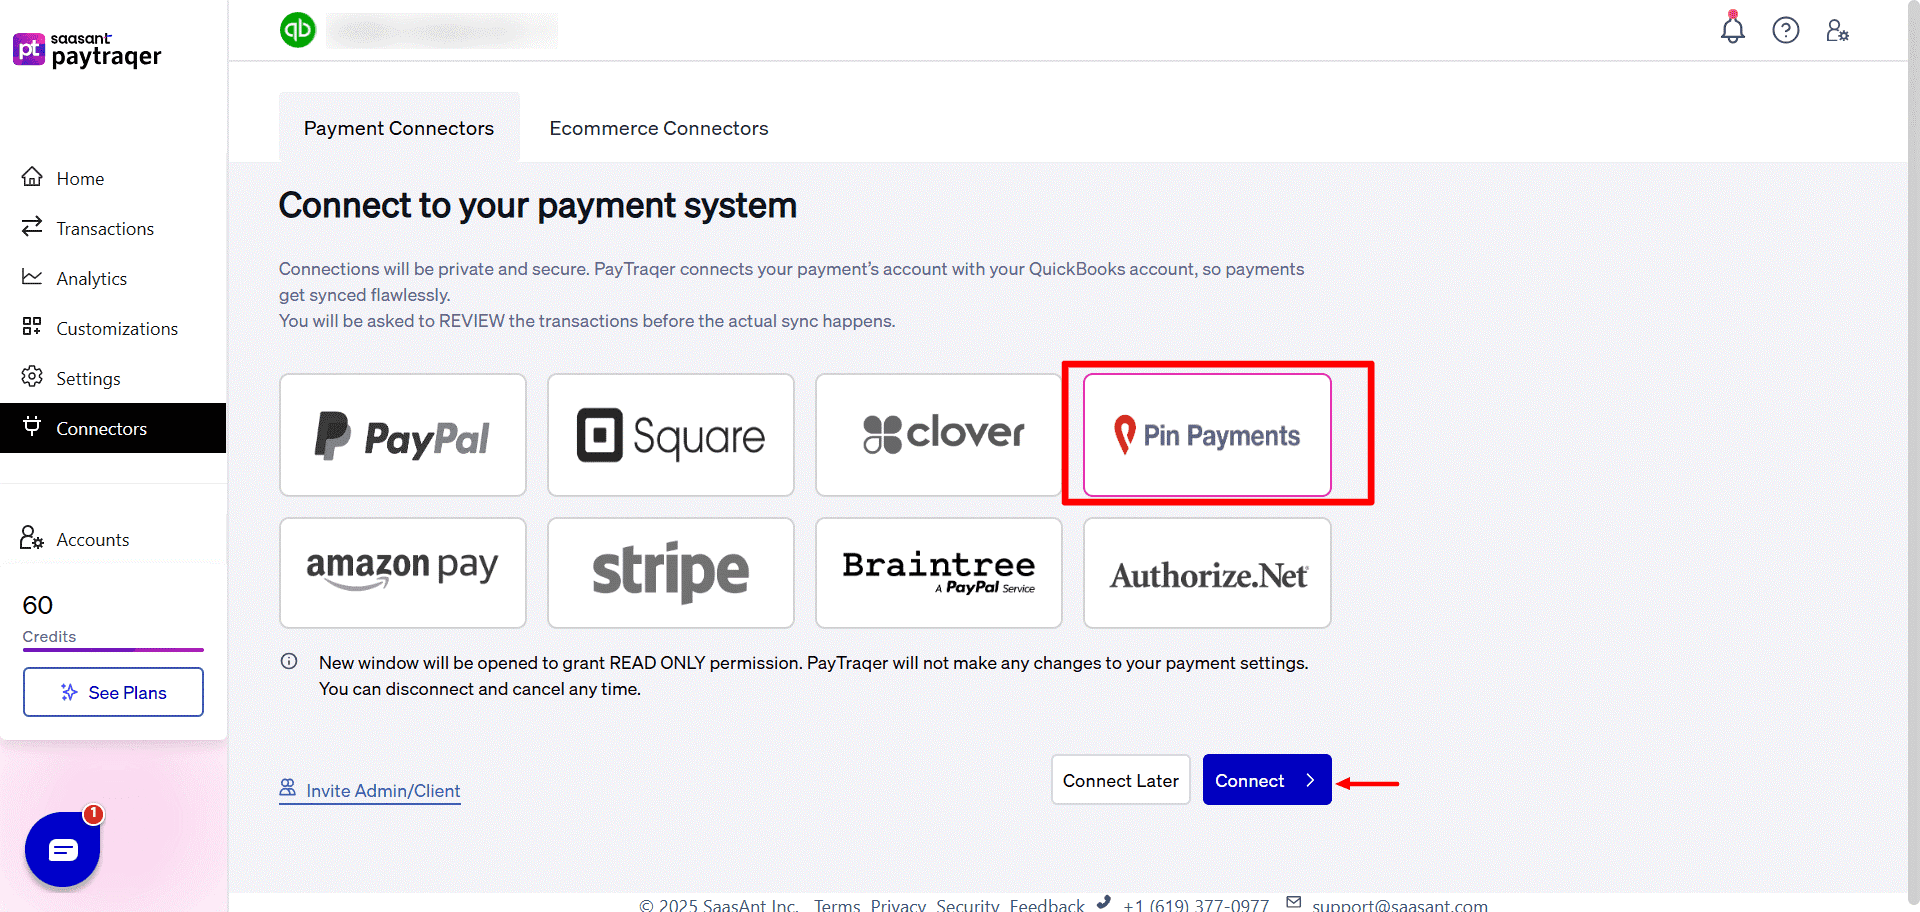
Select “Proceed.” You will be redirected to the PinPayments login interface.
You will be directed to the PinPayments login interface.
Enter your PinPayments admin email and password to sign in.
Pick the PinPayments account that aligns with your business (if you have multiple accounts).
Click Connect to enable the link between PinPayments and PayTracker.
You will automatically return to PayTracker to continue the setup process.
If You Are Not the PinPaymentsAdmin:
Select Invite Admin or Client and choose PinPayments from the available account authorization options.
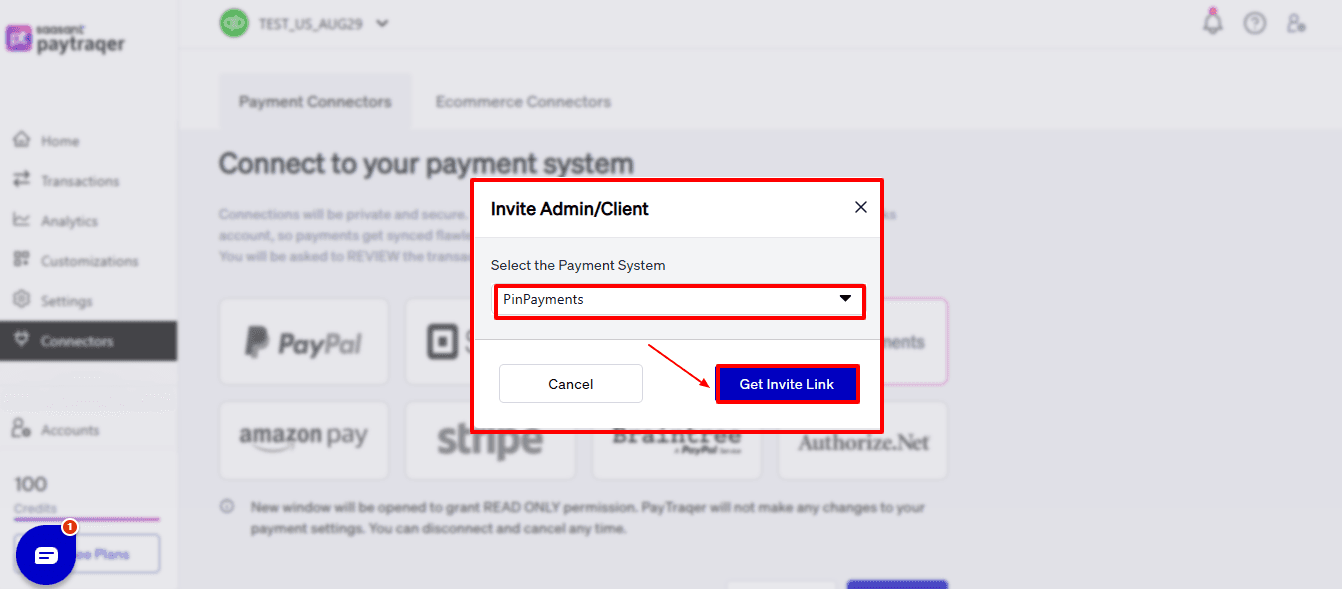
Click on Get Invite Link to create a secure connection link.
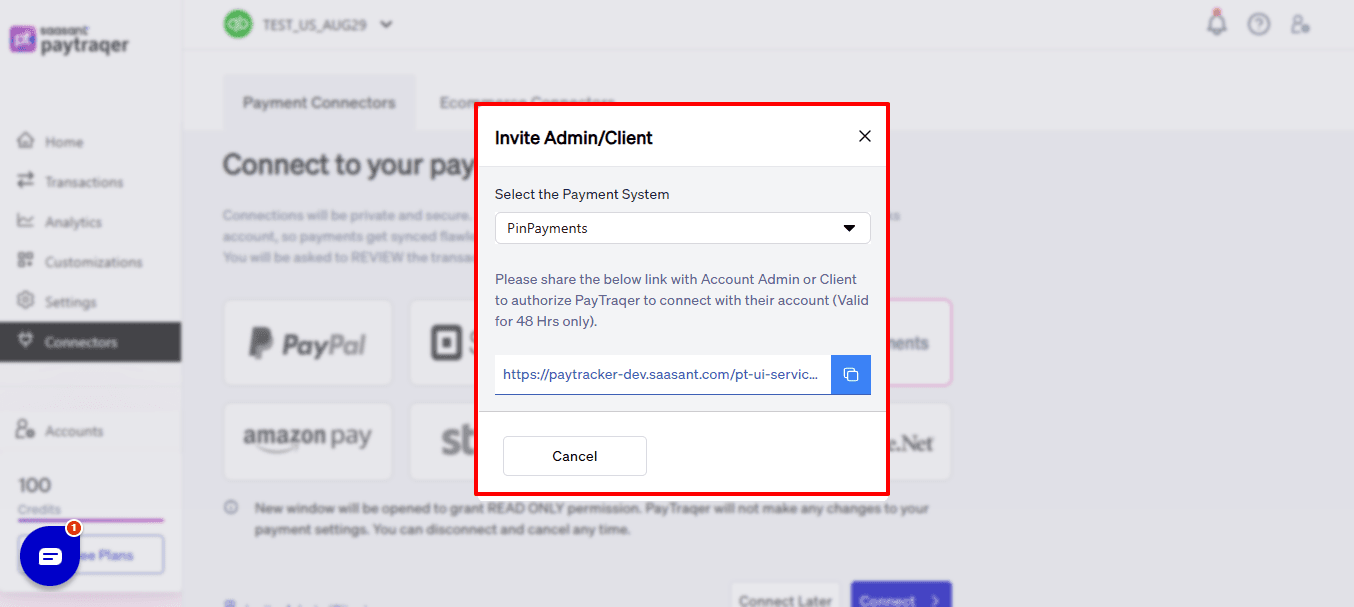
Distribute the link to the account owner; they need to finalize the authorization.
The link remains valid for 48 hours, so make sure to confirm promptly.
Once the admin authorizes, access will sync back to PayTracker.
Once done, PayTraQer will link to your PinPayments account successfully.
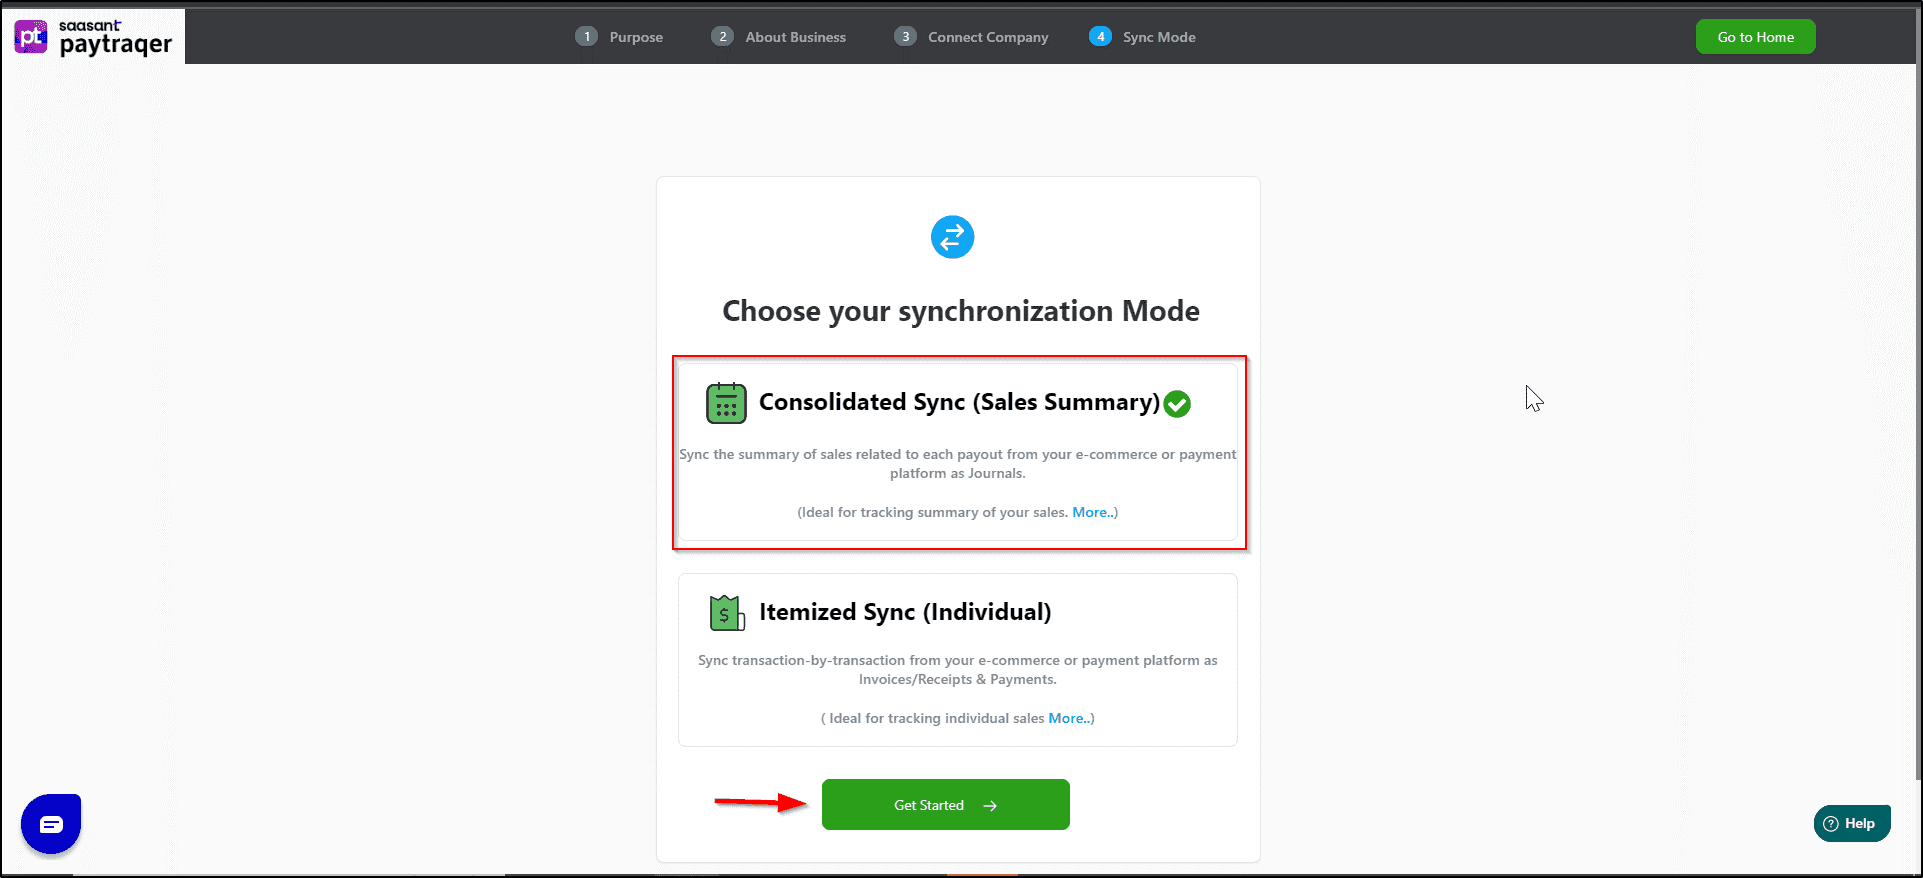
Step 4: Choose Your Data Sync Mode
PayTracker features two synchronization formats that specify how PinPayments transactions will be documented in QuickBooks:
Option A: Consolidated Sync (Sales Summary)
Ideal for companies with significant daily or weekly transaction volumes.
Transactions are consolidated into summary entries instead of being listed as individual invoices or receipts.
Helps keep ledgers cleaner and reduces transaction load in QuickBooks.
Enhances reconciliation speed as payouts and deposits align more predictably.
Option B: Itemized Sync (Individual Transaction Posting)
It is recommended if you need thorough line-level data for your reporting or recordkeeping needs.
Each transaction from PinPayments is entered individually into QuickBooks.
Customer information, product details, tax information, and payment data are entirely traceable.
To continue:
Choose the synchronization mode that best represents how you wish the data to be displayed in QuickBooks.
Press Get Started to validate your selection and proceed.
To modify your sync mode, click on the mode you wish to select, as indicated in the image below.
A pop-up will appear, asking you to disconnect the prior connectors before you can change the sync mode. You may proceed based on your preference.

Step 5: Configure Posting and Settlement Preferences
After connecting to PinPayments, PayTracker will request your accounting setup preferences:
Select whether PayTracker is to automatically process PinPayments payouts and settlements.
Choose the bank account in QuickBooks that will record PinPayments deposits.
Assign the income account for sales revenue (like Sales Income or Online Sales).
Assign the expense account for PinPayments processing fees (for example, Merchant Fees).
Choose how PayTracker should match or create customer records:
Match by email
Match by name
Always create a new customer
Review the tax rate settings and decide how taxes should be mapped in QuickBooks.
After verifying all mappings and routing details, click Save Settings.
Step 6: Review Transactions Before Syncing to QuickBooks
The Transactions dashboard has various organizational views that assist in managing and checking your data flow:
Section | Purpose |
Review | Lists transactions that are ready for syncing. |
Synced | Includes transactions that have already been sent to QuickBooks. |
Error | List transactions that failed and need to be corrected. |
Ignore | Keeps track of transactions you deliberately avoided. |
Sync History | Provides a full timeline log of previous syncs. |
To review a transaction:
Select any transaction row in the Review tab.
Verify:
Customer name or match settings
Product or service item mapping
Revenue and fee accounts
Payment date accuracy
Tax treatment
Make modifications if needed.
Click Sync to forward the transaction to QuickBooks.
Step 7: Enable Auto-Sync (Optional but Recommended)
Auto Sync is off by default to allow manual review of the first transactions.
Once you have validated that the mapping is correct and the entries are posting accurately:
Turn Auto Sync ON.
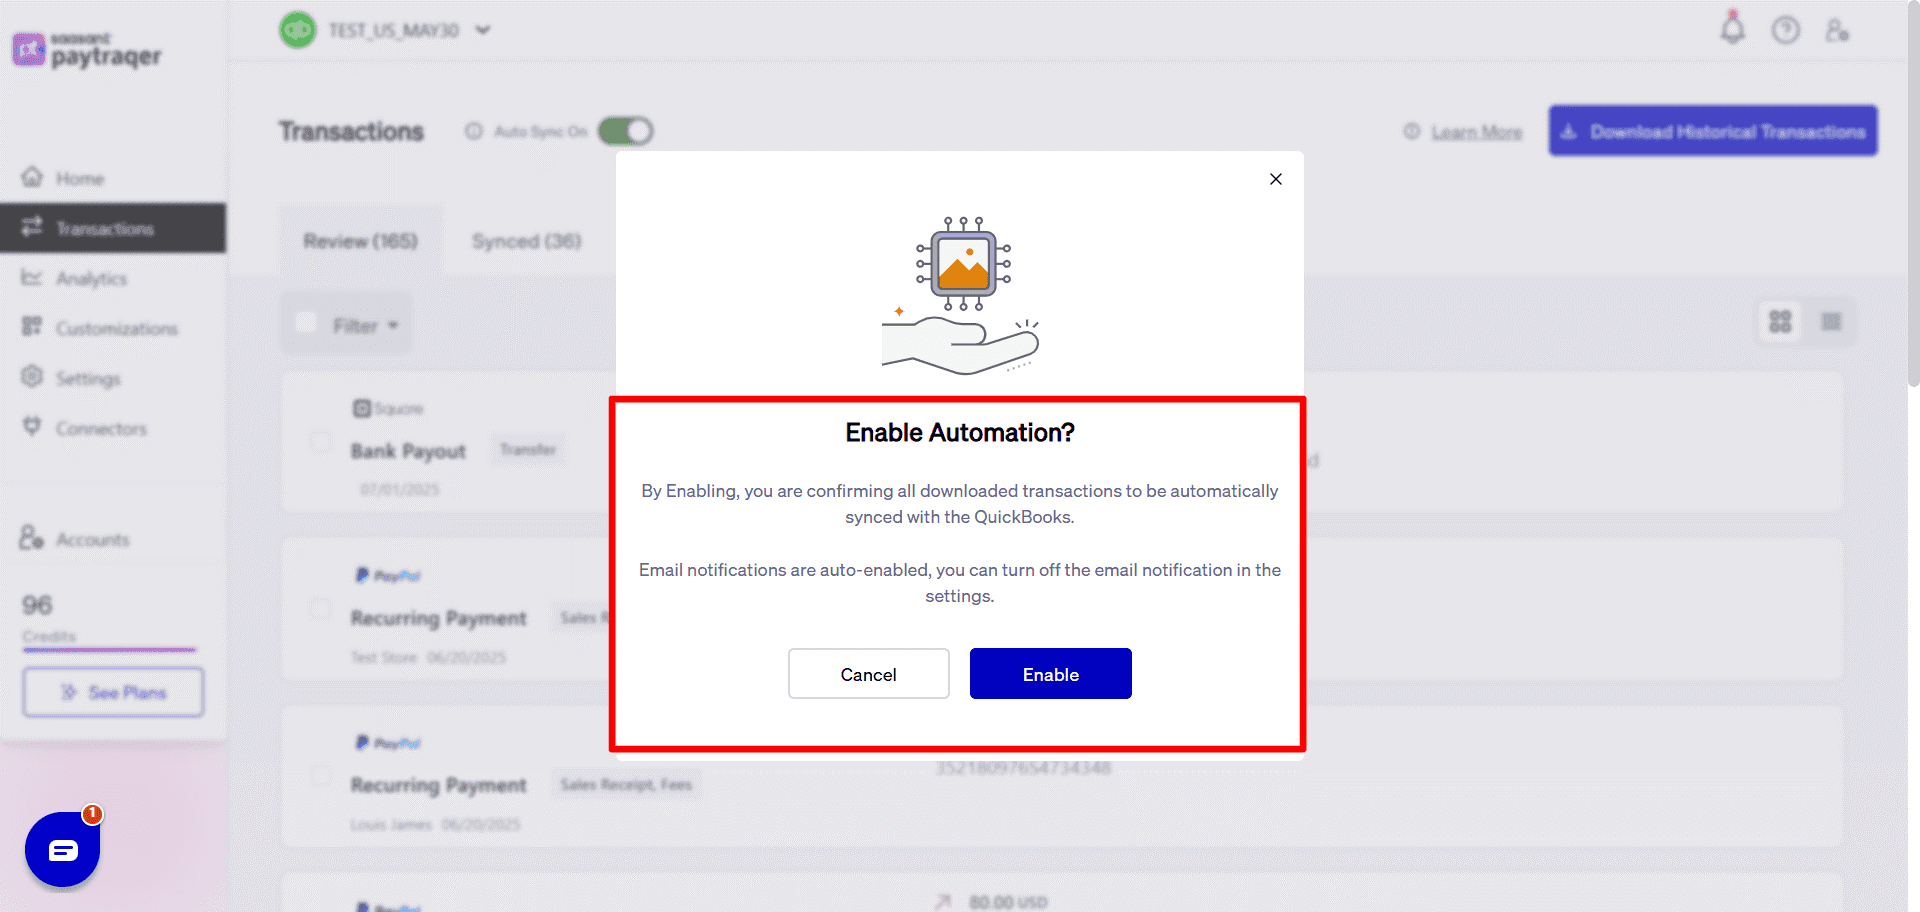
PayTracker will then:
Automatically identify new PinPayments transactions.
Implement your mapping rules.
Sync them into QuickBooks regularly.
Step 8: Download Recent PinPayments Transactions
Select Download Transactions from the PayTracker dashboard.
PayTracker fetches transaction history from PinPayments for the past 60 days.
Only finalized PinPayments transactions are downloaded to avoid syncing any pending or incomplete charges.
Once the download is complete, the transactions will be listed in the Transactions section for your review.
Step 9: Download historical PinPayments Transactions
Once your settings have been configured:
Proceed to the Transactions screen in PayTraQer.
Click on Download Historical Transactions.
Choose the date range for your previous PinPayments orders.
Download the information. PayTraQer will showcase these records in the Review tab.
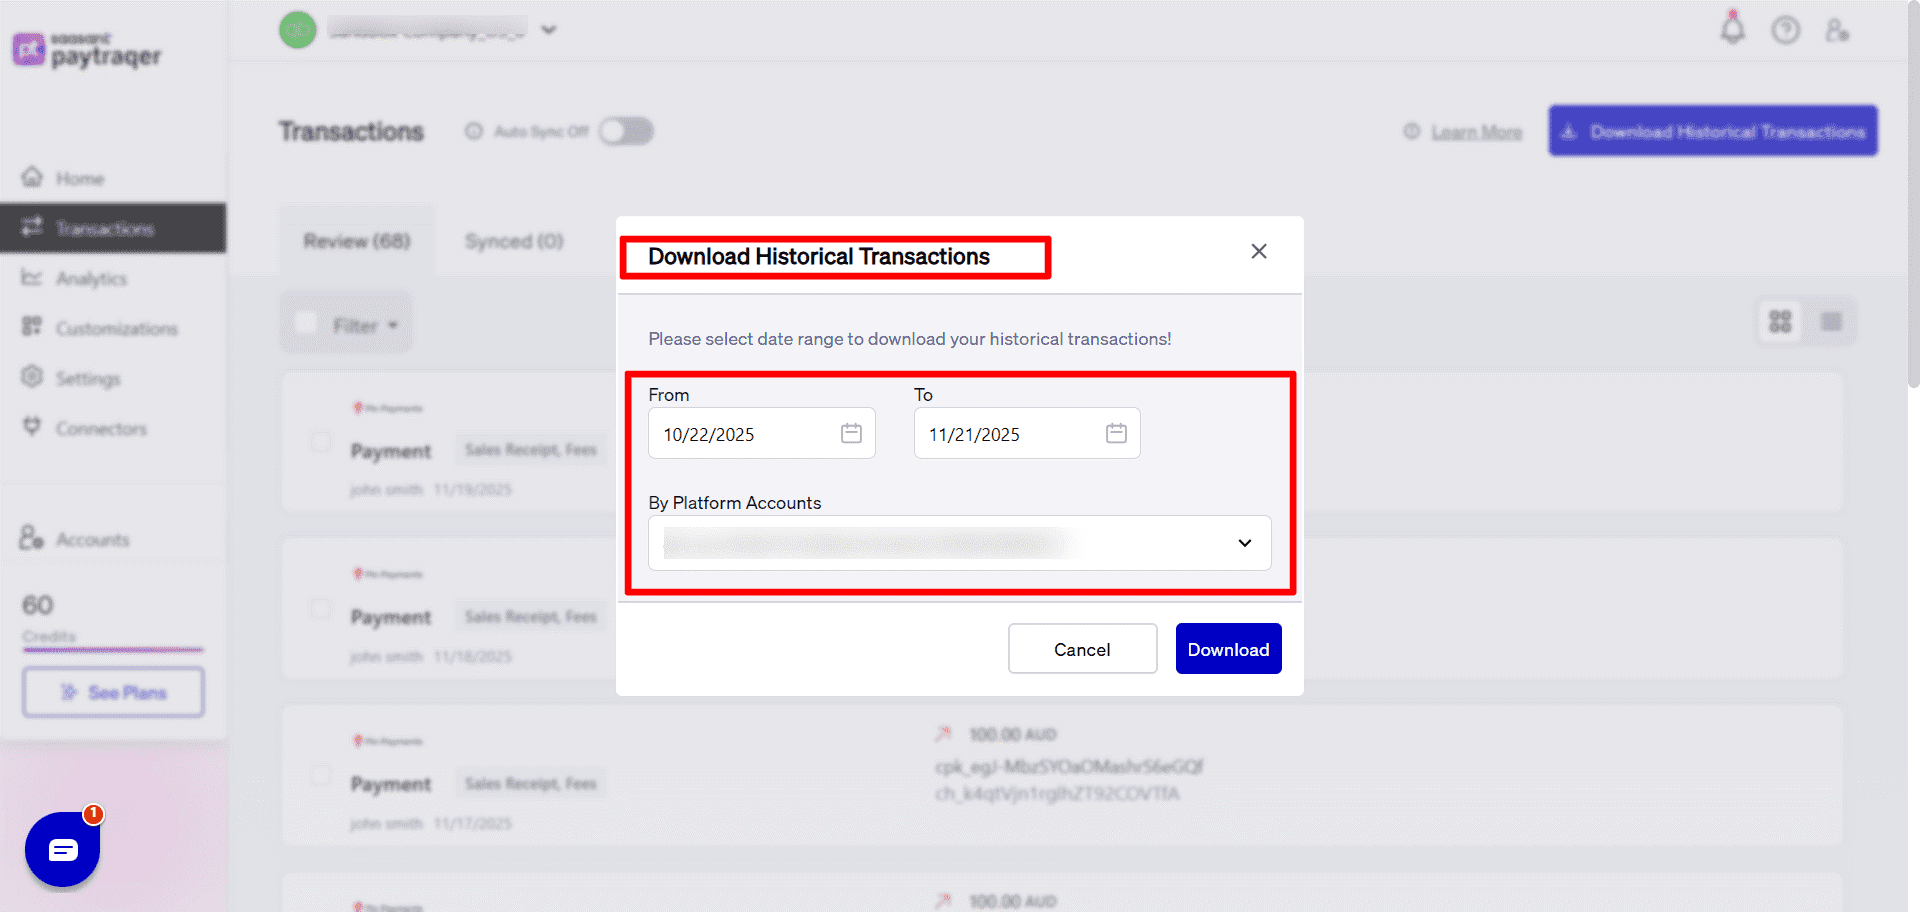
Inspect a few sample transactions, then select and click Sync to send them to QuickBooks.
Start with smaller ranges for testing, then use larger ranges when you feel ready.
Why PayTraQer is the Best Choice for PinPayments–QuickBooks Integration
To integrate PinPayments with QuickBooks Online, one must consider more than simply syncing sales data, it calls for a system that understands the specific way PinPayments deals with authorizations, captures, fees, refunds, and payouts. PayTraQer is tailored to simplify this complexity, making it the most reliable and efficient option for merchants, accountants, and bookkeepers associated with PinPayments. Here’s why:
Clean reconciliation with automated payouts: PayTraQer automatically aligns PinPayments payouts with related sales and fees, making reconciliation easier, avoiding mismatches, and ensuring your QuickBooks balance reflects your PinPayments account activity in real time.
Flexible sync modes for every business: Whether you choose consolidated daily summaries or detailed itemized transaction postings, PayTraQer is designed to adapt to your bookkeeping approach, rendering it ideal for both high-volume merchants and accountants who focus on details.
Real-time bookkeeping automation: With Auto Sync activated, PayTraQer consistently monitors new PinPayments transactions, implements your accounting preferences, and refreshes QuickBooks immediately, ensuring real-time financial visibility without the need for manual input.
Comprehensive Historical Imports: PayTraQer enables the smooth import of past PinPayments transactions, ensuring thorough financial records, accurate trend analysis, and organized bookkeeping, even in cases where sync was not previously activated.
Wrap Up
Integrating PinPayments with QuickBooks Online through PayTraQer is more than just a technical arrangement, it represents a long-term upgrade to your financial management. Once linked, you will experience a more consistent, dependable, and automated bookkeeping system that reflects your business activities in real time. Say goodbye to missing fees, mismatched balances, and backdated entries. PayTraQer guarantees that every detail from PinPayments is accurately transferred into QuickBooks. If your objective is to streamline reconciliation, minimize manual errors, and uphold an organized financial framework, this integration is a wise and forward-thinking investment for your enterprise.
If you have inquiries regarding our products, features, trial, or pricing, or if you require a personalised demo, contact our team today. We are ready to help you find the ideal solution for your QuickBooks workflow.
Frequently Asked Questions
1) Can I undo or correct a synced PinPayments transaction?
Yes. PayTraQer has a strong rollback feature that lets you undo, change, or re-sync wrong entries. This gives you full control and stops accidental posting mistakes in your QuickBooks Online file.
2) Does PayTraQer import historical PinPayments transactions?
Yes. PayTraQer can import up to sixty days or more of transaction history from PinPayments, enabling you to review, adjust, and sync previous activities into QuickBooks Online effectively and accurately.
3) What happens if a PinPayments transaction fails to sync?
Failed transactions are displayed in the Error tab along with explanations. You can resolve mapping errors, change data, and re-sync without disrupting other synced entries.
4) Will PayTraQer create duplicate customers or product items in QuickBooks?
No. PayTraQer employs smart matching rules to prevent duplicates. You can set up customer and item preferences to maintain tidy, organized QuickBooks data without mess.
5) Will PayTraQer change or overwrite existing data inside QuickBooks Online?
No. PayTraQer only adds new entries according to your mapping choices, making sure your current QuickBooks records stay unchanged unless you choose to manually undo and re-sync transactions.