Integrate QuickBooks to Braintree
As your business expands, managing Braintree transactions becomes more complicated, as payments are divided among products, refunds, processing fees, and daily deposits, creating a complex web of financial data. Without proper integration, these figures often need hours of manual sorting in QuickBooks Online. PayTraQer streamlines this process by serving as a link between Braintree and QuickBooks, converting raw payment data into organized, categorized, and ready-to-reconcile accounting records.
This guide will help you connect Braintree with QuickBooks Online using PayTraQer, allowing you to automate your workflows, maintain accuracy, and dedicate your time to real business decisions instead of bookkeeping tasks.
This blog suits businesses that utilize Braintree, finance professionals, bookkeeping teams, and online merchants looking for smooth data syncing, clearer QuickBooks Online records, and easy handling of payments, fees, and settlements.
Contents
How to Integrate Braintree with QuickBooks Online using PayTraQer (Step-by-Step Guide)
Why PayTraQer is the Best Choice for Braintree–QuickBooks Integration
Wrap Up
Frequently Asked Questions
How to Integrate Braintree with QuickBooks Online using PayTraQer (Step-by-Step Guide)
Step 1: Install PayTraQer from the QuickBooks App Store
Sign in to your QuickBooks Online account.
Go to the Apps menu on the left side.
Look for PayTraQer and click on Get App Now.
Follow the instructions to authorise PayTraQer to link to your QuickBooks company file.
Step 2: Launch PayTraQer and Complete Initial Setup
After installation, launch PayTraQer from the Apps menu.
Select your QuickBooks company and verify the access permissions.
PayTraQer will assist you with an initial onboarding process to establish your syncing preferences.
This helps PayTraQer to understand your recording and tracking requirements.
Step 3: Connect Your BraintreeSeller Account to PayTraQer
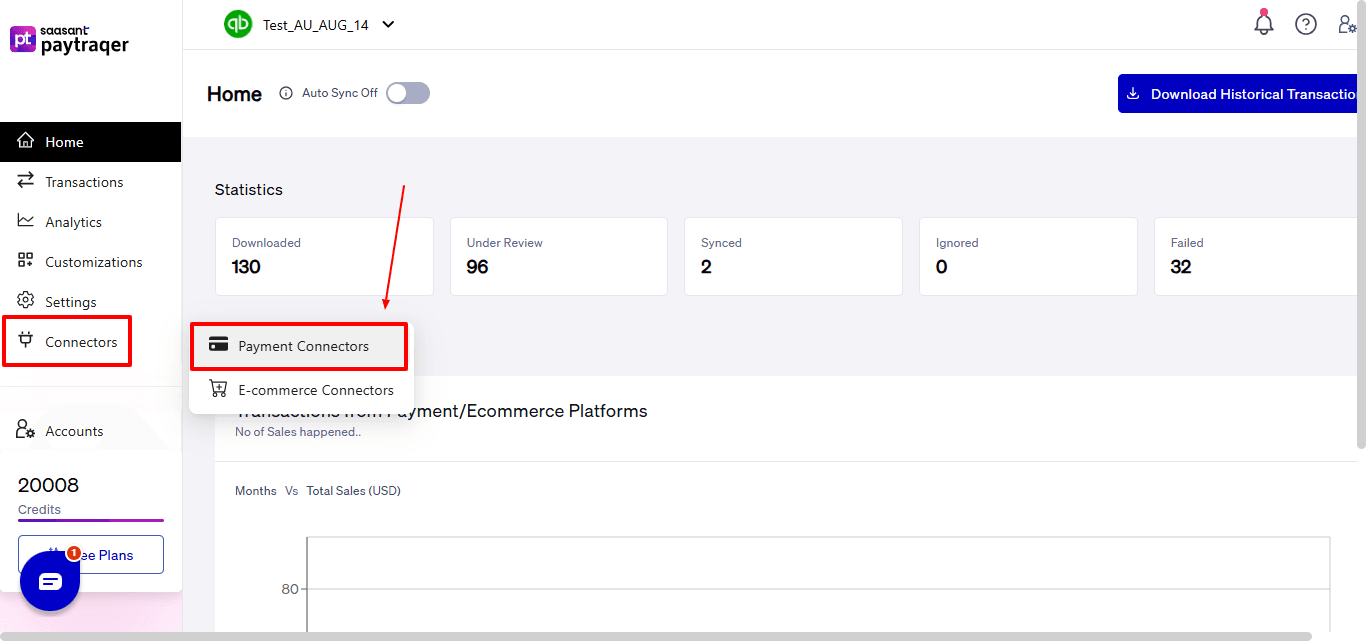
Select the “Connectors” option seen on the left side of the PayTraQer dashboard. Now, select “Payment Connectors” from the dropdown.
Choose Braintree from the list of supported payment and sales channels.
Choose one of the following methods based on your administrative access to Square:
If You Are the BraintreeAdmin:
Select the Connect button visible on the Braintree connector card.
Select “Proceed.” You will be redirected to the Braintree login interface.
You will be directed to the Braintree login interface.
Enter your Braintree admin email and password to sign in.
Pick the Braintree account that aligns with your business (if you have multiple accounts).
Click Connect to enable the link between Braintree and PayTracker.
You will automatically return to PayTracker to continue the setup process.
If You Are Not the SquareAdmin:
Select Invite Admin or Client and choose Braintree from the available account authorization options.
Click on Get Invite Link to create a secure connection link.
Distribute the link to the account owner; they need to finalize the authorization.
The link remains valid for 48 hours, so make sure to confirm promptly.
Once the admin authorizes, access will sync back to PayTracker.
Once done, PayTraQer will link to your Braintree account successfully.
Step 4: Choose Your Data Sync Mode
PayTracker features two sync formats that specify how Braintree transactions will be documented in QuickBooks:
Option A: Consolidated Sync (Sales Summary)
Ideal for companies with significant daily or weekly transaction volumes.
Transactions are consolidated into summary entries instead of being listed as individual invoices or receipts.
Helps keep ledgers cleaner and decreases the transaction load within QuickBooks.
Enhances the speed of reconciliation as payouts and deposits align in a more predictable manner.
Option B: Itemized Sync (Individual Transaction Posting)
It is recommended if you need thorough line-level data for your reporting or recordkeeping needs.
Each transaction from Braintree is entered individually into QuickBooks.
Customer information, product details, tax information, and payment data are entirely traceable.
To continue:
Choose the sync mode that best represents how you wish the data to be displayed in QuickBooks.
Press Get Started to validate your selection and proceed.
Step 5: Configure Posting and Settlement Preferences
After connecting to Square, PayTracker will request your accounting setup preferences:
Select whether PayTracker is to automatically process Braintree payouts and settlements.
Choose the bank account in QuickBooks that will record Braintreedeposits.
Assign the income account for sales revenue (like Sales Income or Online Sales).
Assign the expense account for Braintree processing fees (for example, Merchant Fees).
Choose how PayTracker should match or create customer records:
Match by email
Match by name
Always create a new customer
Review the tax rate settings and decide how taxes should be mapped in QuickBooks.
After verifying all mappings and routing details, click Save Settings.
Step 6: Review Transactions Before Syncing to QuickBooks
The Transactions dashboard has various organizational views that assist in managing and checking your data flow:
Section | Purpose |
Review | Lists transactions that are ready for syncing. |
Synced | Includes transactions that have already been sent to QuickBooks. |
Error | List transactions that failed and need to be corrected. |
Ignore | Keeps track of transactions you deliberately avoided. |
Sync History | Provides a full timeline log of previous syncs. |
To review a transaction:
Select any transaction row in the Review tab.
Verify:
Customer name or match settings
Product or service item mapping
Revenue and fee accounts
Payment date accuracy
Tax treatment
Make modifications if needed.
Click Sync to forward the transaction to QuickBooks.
Step 7: Enable Auto-Sync (Optional but Recommended)
Auto Sync is set to off by default to permit a manual review of the first transactions.
Once you have validated that the mapping is correct and the entries are posting accurately:
Turn Auto Sync ON.
PayTracker will then:
Automatically identify new Braintree transactions.
Implement your mapping rules.
Sync them into QuickBooks regularly.
Step 8: Download Recent Braintree Transactions
Select Download Transactions from the PayTracker dashboard.
PayTracker fetches the past 60 days of transaction history from Braintree.
Only finalized Braintree transactions are downloaded to avoid syncing any pending or incomplete charges.
Once the download is complete, the transactions will be listed in the Transactions section for your review.
Step 9: Download historical Braintree Transactions
Once your settings have been configured:
Proceed to the Transactions screen in PayTraQer.
Click on Download Historical Transactions.
Choose the date range for your previous Braintree orders.
Download the information. PayTraQer will showcase these records in the Review tab.
Inspect a few sample transactions, then select and click Sync to send them to QuickBooks.
Start with smaller ranges for testing, then use larger ranges when you feel ready.
Why PayTraQer is the Best Choice for Braintree–QuickBooks Integration
Smooth Data Syncing: The sync engine records new Braintree transactions instantly and directs them into QuickBooks automatically. You no longer require spreadsheets, CSV uploads, or repetitive manual entries to maintain your financial records up to date.
Clean Reconciliation: Braintree payouts usually have fees, partial payments, or various types of transactions. PayTraQer analyzes each deposit, accurately categorizes it, and automatically links it to the appropriate transactions in QuickBooks, making reconciliation easier.
Two Simple Sync Modes: PayTraQer gives you the option to decide how Braintree data is shown in QuickBooks. Consolidated Sync compiles daily or weekly totals to keep QBO tidy and efficient. Itemized Sync details each transaction separately for complete detail and traceability. Simply select the mode that suits your bookkeeping preferences.
Error-Free Automation: All Braintree transactions are seamlessly integrated into QuickBooks without the need for manual input. PayTraQer eliminates duplicates, prevents missed entries, and ensures consistency, maintaining your financial records are always ready for audits.
Handles High Volumes: PayTraQer is designed specifically for Braintree merchants who handle hundreds or thousands of transactions. It efficiently syncs large amounts of data swiftly, ensuring your QuickBooks file remains responsive.
Wrap Up
Integrating Braintree with QuickBooks Online via PayTraQer provides your business with a systematic and reliable method to oversee daily payment activities without the need for constant manual input.
Each sale, refund, fee, and deposit is seamlessly recorded in QuickBooks, ensuring clarity and consistency, which helps you maintain accurate financial records throughout the year.
Whether you process a few transactions or thousands monthly, PayTraQer guarantees that your data is well-organized, properly mapped, and prepared for reconciliation. After the initial setup, your accounting system operates with significantly reduced effort and enhanced accuracy.
With this integration established, your financial processes become more streamlined, quicker, and considerably more precise.
If you have inquiries regarding our products, features, trial, or pricing, or if you require a personalised demo, contact our team today. We are ready to help you find the ideal solution for your QuickBooks workflow.
Frequently Asked Questions
1) Can I sync historical Braintree transactions into QuickBooks?
Yes, with PayTraQer, you can download Braintree data from the last 60 days, which helps you to backfill past entries and keep a complete financial record.
2) Can I edit or adjust transactions before syncing to QuickBooks?
Certainly, PayTraQer features a Review screen where you can change mapping, assign customers, update item details, and set tax configurations before syncing.
3) Can accountants use PayTraQer for multiple Braintree clients?
Of course. PayTraQer enables multi-client management, providing convenience for accountants and bookkeeping firms that oversee several Braintree merchant accounts.
4) Does PayTraQer handle Braintree processing fees automatically?
Yes, Braintree fees are automatically recorded and captured in your assigned expense account within QuickBooks, ensuring accurate reporting of profits.
5) What happens if a Braintree transaction fails to sync?
Failed transactions are listed in the Error tab along with a comprehensive explanation. You have the option to adjust the mapping or settings and immediately re-sync the transaction.
6) Can I switch between consolidated and itemized sync modes?
Yes. You have the ability to modify your sync mode at any time. PayTraQer will implement the new settings for upcoming transactions while leaving the already synced data unchanged.